[WORDPRESS_PDF]
If you press the lower button (ENTER) when the MENU item is highlighted on the → additional information screen, you may choose between 4 commands:
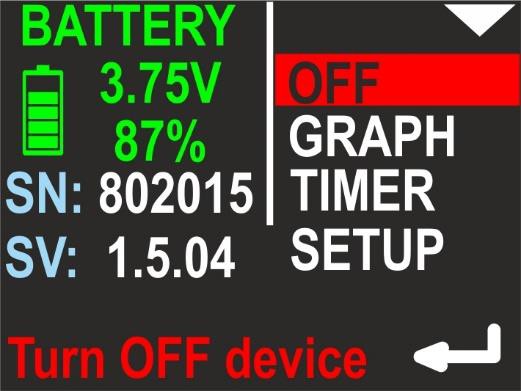
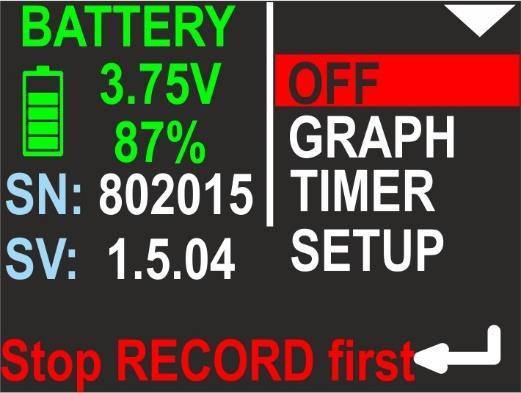
OFF
Allows you to switch off the device. The left part of the screen shows information about the present battery charge. Below that you see the device serial number (SN) (unique device identifier) and the internal software version (SV), as illustrated below:
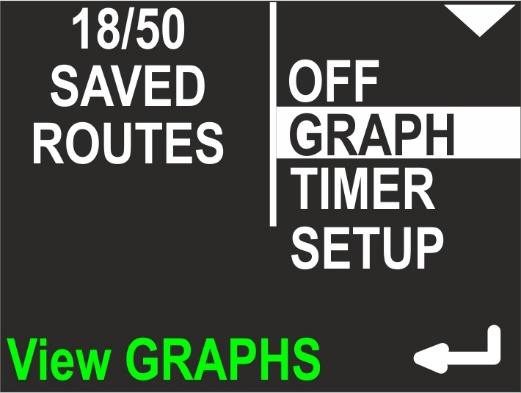
GRAPH
Allows you to show the position and depth graphs on the device screen. More info about graphs can be found in chapter 9 and 10. On the left side of the screen, the device shows 2 numbers: Current routes in memory / maximum routes in memory.
More about memory organization can be found → here.
Depth profile graph
If you press the lower button (ENTER), when the GRAPH item on the MENU screen is highlighted, you will be redirected to the simple graph browser. The first available graph is called ‘depth profile’ and contains a representation of dive depth vs time, as shown below:
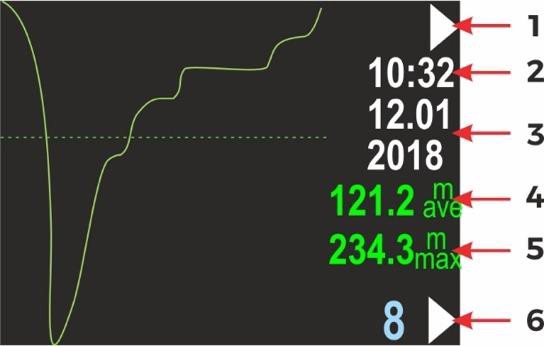
- Top button role (now – go to next graph: swim route graph)
- Time of first recorded data (hh:mm, 24-hour system)
- Date of first recorded data (DD.MM / YYYY)
- Average depth (if it can be evaluated
- Maximum depth (if it can be evaluated)
- Route number in memory (blue) and lower button role
(now – go to the next route number)
Swim route graph
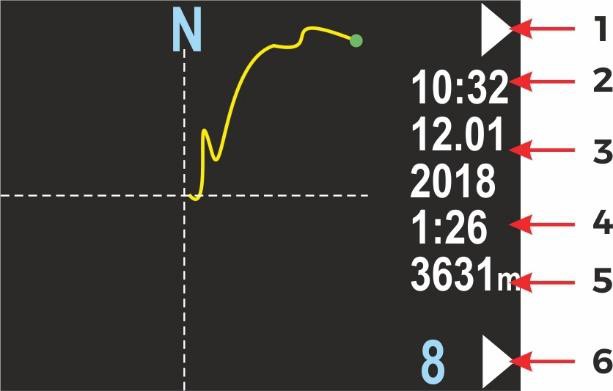
This screen presents the changes in the diver location projected on a flat surface
(like on a map). The route start point is always positioned in the screen center.
The route end point will be shown as a green dot, but only on the present route.
Near the right edge of the screen, you will find some information elements:
- Top button role (now – go to next screen: return to main menu)
- Time of first recorded data (hh:mm, 24-hour system)
- Date of first recorded data (DD.MM / YYYY)
- Total recording time, in minutes (above 2h, this value will be shown in hours), may be blank, if the value cannot be calculated (empty record)
- Total distance in meters (above 2000m in kilometers), may be blank, if the value cannot be calculated (empty record)
- Route number in memory (blue) and lower button role
(now – go to the next route number
You may tilt the device to the left or to the right, in order to change the button roles on this screen. When tilted left, the lower button brings you to previous route number. When tilted right, the lower button will allow you to delete the current route. When tilted left, the upper button brings you to the previous graph (depth profile). This can be done on both graph screens:
Device tilted left
| Top button | Bottom button | |
| Previous screen | Previous route | |
| Next screen | Next route | |
 | Next screen | Next route |
TIMER
Allows you to start, stop and clear the internal stopwatch.
The stopwatch is described below.

Stopwatch
If you press the lower button (ENTER) when the TIMER item on the MENU screen is highlighted, you will be redirected to the TIMER/STOPWATCH control screen:
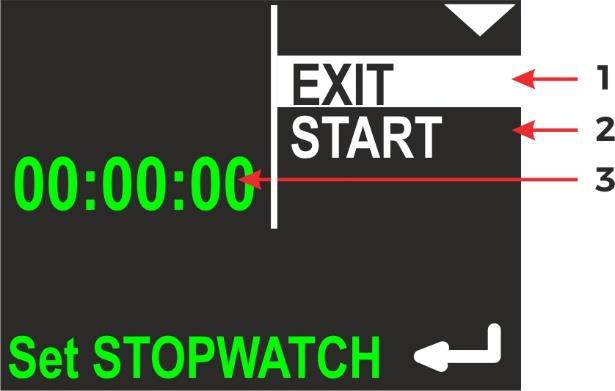
- EXIT – current selected command; if you press lower button (ENTER), you will return to main navigation screen
- Timer START – option to start TIMER/STOPWATCH for counting
- Current TIMER/STOPWATCH value (up to hh:mm:ss – hours: minutes: seconds)
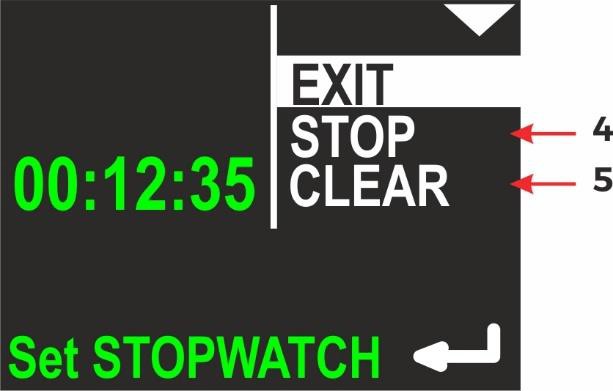
- Timer STOP – option to stop TIMER/STOPWATCH
- Timer CLEAR – option to clear TIMER/STOPWATCH
If TIMER/STOPWATCH is running, there will be options to STOP and CLEAR its value.
STOP will leave the TIMER/STOPWATCH value unchanged (you will be able to start it again and continue counting). CLEAR will set the TIMER/STOPWATCH value to 00:00:00, but the stopwatch will not be automatically stopped with this command.
SETUP
This allows you to show and change all internal configuration parameters.
Device settings are organized in 2 screens. The selected function is highlighted.
The top button (NEXT) will switch the selected function to the next one (below).
The bottom button (ENTER) will activate the selected item.
On the left side on the screen, the most important settings are shown in short form (to avoid unnecessary activation of the configuration just to check it).
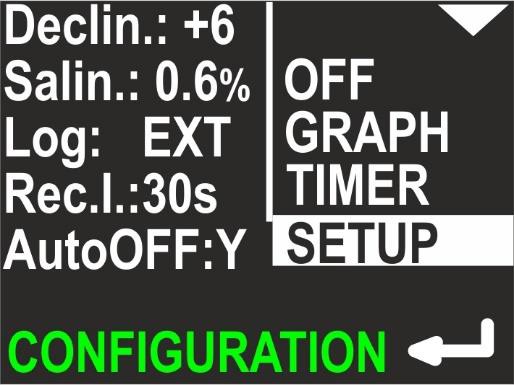
If you press the lower button (ENTER) when the SETUP item on the MENU screen is highlighted, you will be redirected to the SETUP menu.
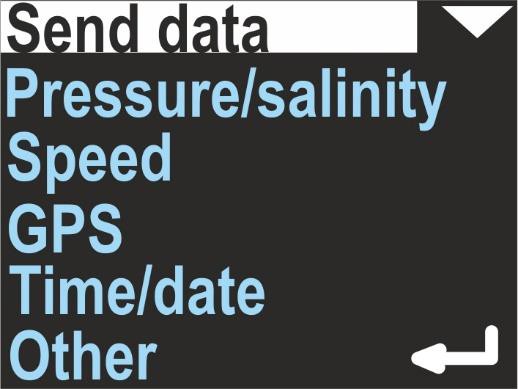
Send data
Used to activate the internal Bluetooth transmitter and allow USB connection.
Activate it before any data transmission from the navigation device to a PC or smartphone. When this function is activated, the device will not power off automatically (except when the battery is low).
In data transfer mode, device screen looks like this :
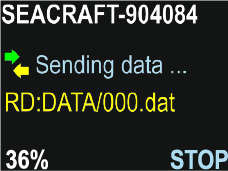
First line shows device name – the same name you will see in Bluetooth environment.
Green and yellow arrows will change to gray color, when transmission was broken.
Yellow text describes current operation (RD = reading, then file name).
In left bottom corner you will see progress indicator, in %.
You can always break communication by pressing lower ENC3 button (STOP).
Pressure/salinity
Shows the current pressure in milibar (green color). 1 PSI ≈ 68,95 milibar.
When no pressure is shown, the pressure sensor is defective.
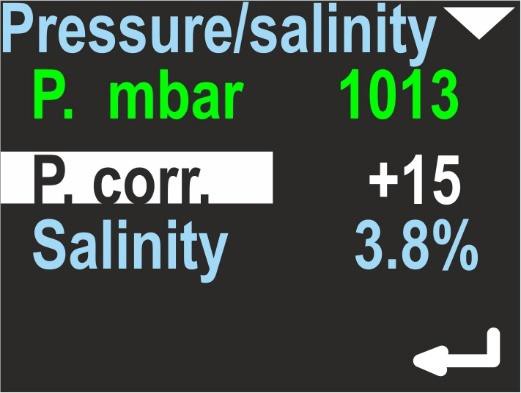
The lower line shows the pressure correction (white color) – this value will be added to the raw value of the measured pressure. It has no effect on depth calculations, but the value will be added to the pressure measurement shown above, so the user may calibrate this device as a precision barometer.
The last line allows to set the water salinity from 0.0% (fresh water) to 4.0%.
This coefficient affects the pressure-to-depth transformation and should have an appropriate value.
When the item is highlighted, pressing lower button will allow to edit its value.
Speed
This navigation console can work with an external sensor (speed sensor) or without it (inertial mode). This option can be used to switch between these two modes.
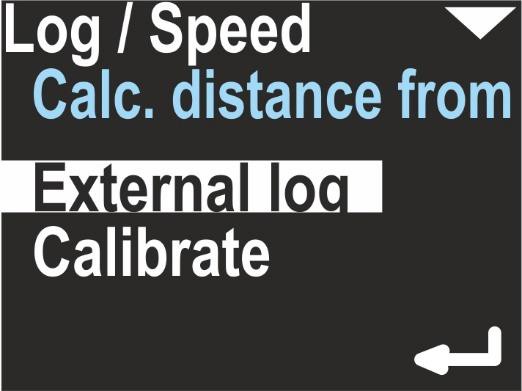
The field ‘Calc. distance from’ may switch between ‘External log’ and ‘Const. speed’.
The first value needs an external speed sensor (log) to be connected.
If chosen, on the right side of the main navigation screen, this icon will be displayed:
The option ‘Calibrate’ may change its coefficient, which is used to convert sensor pulses into speed and distance:
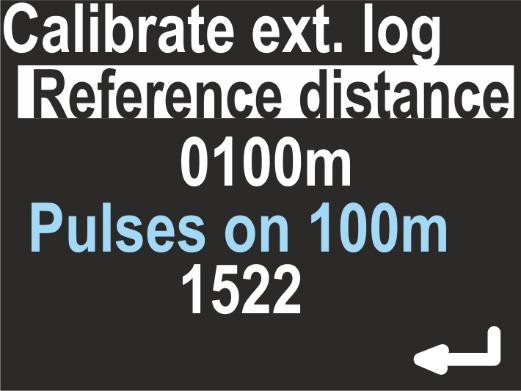
If you want to recalibrate the sensor, set the chosen distance in meters (reference distance) by pressing the lower button and changing the value digit by digit.
Then, you will be guided to the next item, which shows how many pulses are counted in a distance of 100m. By pressing the lower button again, a new calibration begins:
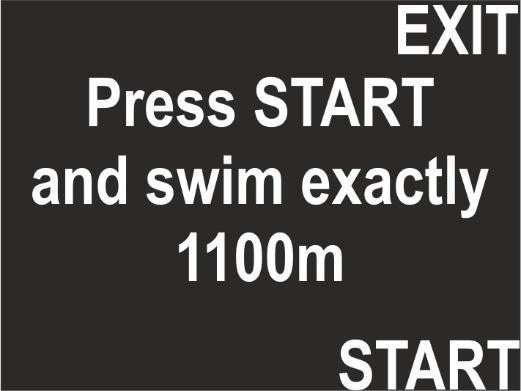
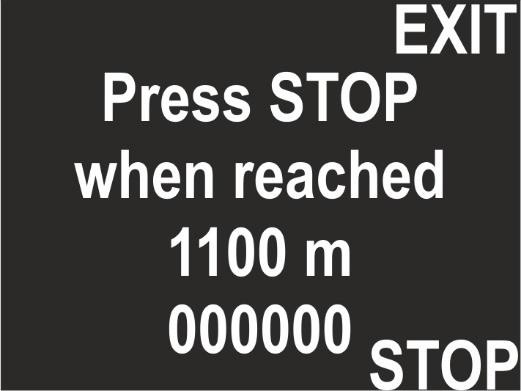
Press START and swim straight with no depth change, until the chosen distance is reached, then press STOP. The display will show you, how many log pulses were counted.
If no pulses were logged, the calibration will be rejected.
When ‘Calc. distance from’’ is set to ‘Const. speed’’, a constant average speed is chosen to calculate the position (on the main screen, no log symbol is visible).
The option ‘Calibrate’ will allow you to set a constant average speed used to calculate the current position, the return time and the target time.
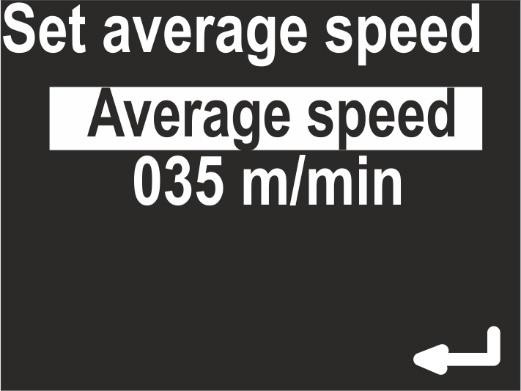
Log/speed calibration
ENC3 operation is different with and without external log sensor. Thus, the ‘Calibrate’ command has also different meanings, depending of the actual sensor settings.
When the external sensor is not used (Calc. distance from = Const. speed), the calibration means to choose an average swimming speed. When the device is in HOLD state, the distance counter does not change. When the user switches the device to RECORD state, the navigation console expects the user to swim with constant speed equal to the value set in this option (e. g. 50 m/min).
This type of operation requires from the user:
- Setting the average swim speed very precisely
- Swimming at constant speed
- Switching between HOLD and RECORD state as quick as possible
When the external sensor is used and connected to the device (Calc. distance from = External log), the calibration is used to get the best possible distance measurements.
The sensor principle of operation is based on pulse counting. The sensor calibration factor equals the number of pulses which the speed sensor will produce while swimming a 100 m distance.
A typical value is 1590 pulses on a 100 m distance. In most cases this value will be between 1400 and 1600 pulses on a 100 m distance.
Pulses value can be altered by type of DPV, mounting position, and influence of for example “propeller suction” effect. Devices are calibrated to be used with Seacraft scooters, which construction allows for optimal sensor placement, and minimizes interferences. While for general orientation underwater factory setting will be fine with most types of DPV’s, for more precise applications- as for example mapping- we recommend speed log calibration with whole set-up used.
This calibration factor depends also on the exact sensor position on the DPV. To get best results, mark the sensor position on the DPV body and perform the calibration procedure as described below:
- Mark the START and STOP point on a straight, known distance (100-1900 meters)
- Go to SETUP -> Log/Speed -> Calibrate log (make sure Active log is set to EXT )
- Enter the known calibration distance in the field log at: …
- Below, you will see the actual calibration factor log 100 m: 1590. Make sure, the arrow points to this line, and press the lower button.
- The screen will show the message Press START and swim exactly …. m
- Go to START, set the favorite speed on your DPV, press START (lower button) on the navigation console, and swim as straight as possible to the STOP point. The screen display will show the pulse counter, which should increase with time.
- When you reach the STOP point, press the lower button again. The new log calibration factor will be shown on the screen.
The calibration procedure needs values in meters. No other units are available.
1 N.M. (Nautical Mile, U.S.) equals 852.0 meters. 100 feet equal 30.48 meters.
100 meters equal 328.08 feet.
It is possible to set the calibration factor also without a need to dive and measure a known distance underwater. In case that logged route indicates deviation of covered distance – and currents presence or wrong mounting/ log damage are not a reason of that, the correct calibration factor “f” can be calculates using following equation:
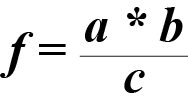
where:
a = length of the section as measured with ENC3
b = current calibration factor (pulses / 100 m)
c = precise known length of the route section
For example: The section being measured has a length of exactly 127 m and ENC has indicated the route length of 124 m. The entered and used in the ENC calibration factor is 1590 pulses / 100 m.

The result is 1555.
After entering the calibration function on the 100 m section, press START and to blow, or use for example a fan until the number 1555 appears and then press STOP. The correct calibration factor will be saved. The above operation is not complicated and takes very little time.
This function may be useful if various configurations of speed sensor are used, and you write down also various calibration factors- corresponding with given set.
There are 2 types of log sensors: Classic (type B) and compact (type C). In the future, there may be even more types.
If you have the classic log, a value between 1550 and 1600 in the calibration field should be good for you. With the compact sensor, you should have good results when the calibration is between 1600 and 1650 pulses/100m.
GPS
This menu option is for information purposes only.
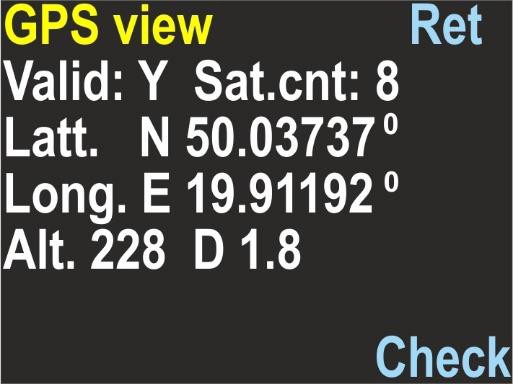
When selected, the navigation screen will show the GPS status information as described below:
- Valid: Y/N – Displays, if GPS information is available now
- Sat.cnt: 0…15 – Number of satellites used to calculate the position (more = better)
- Latt. N/S 0.00000° – Latitude in degrees, can be N(orth) or S(outh)
- Long. E/W 0.00000° – Longitude in degrees, can be E(ast) or W(est)
- Alt. 0.0 – Altitude, meters above sea level
- D 0.0 – Horizontal deviation, always in meters (the lower, the better)
GPS information is refreshed automatically after each successful update on this screen.
The GPS state is also reported as icon on the main screen:

The GPS receiver is automatically switched off, when the water depth is 1.5 m (4.9 ft) or more, in order to save battery. When the water depth is 0.5 m or less (1.6 ft), the GPS receiver is switched on automatically.
After power on, first GPS readings should be available after 20-60 seconds. The GPS antenna is located between the buttons, so you should not cover this point with any objects.
You may tilt the navigation console as far as possible (screen upwards) for a while, to achieve better/quicker GPS readings, but this is not necessary in most cases.
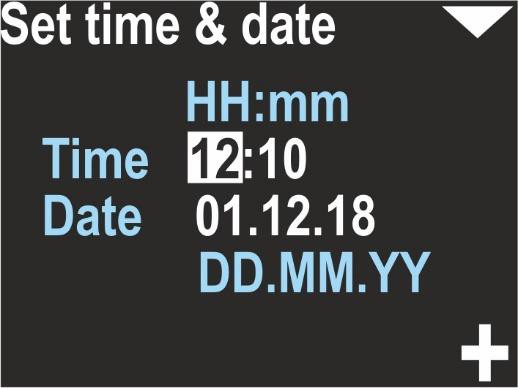
Time/date
This device provides an internal real time clock with calendar.
The time format is 24 hours, the Date format is DAY.MONTH.YEAR. YEAR has only 2 digits. The value 01 means the year 2001, 02 means 2002 and so on.
Other settings – Part 1
Miscellaneous other settings are available as 2 separate screens:
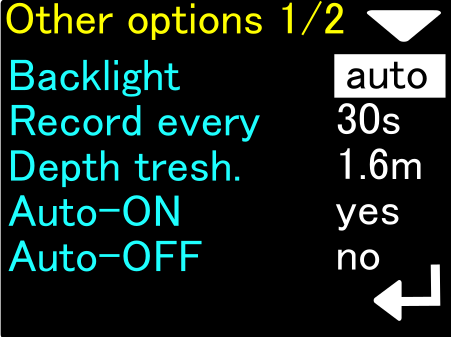
Backlight
[1, 2, 3, 4, 5, auto] – Changes the display backlight intensity. Value 1 means the constant lowest brightness (about 20%), value 5 means the constant maximum brightness (about 95%), value ‘auto’ means that the backlight will be auto adjusted using the ambient light sensor.
Record every
[2 s, 5 s, 10 s, 30 s] – This is the maximum available time space between two records in memory. Note, that in some cases two records may be collected faster than this value, but never longer.
Depth threshold
[0.5 m, 1 m, 1.6 m] – The navigation console will count ‘underwater time’, when the depth is equal or greater than this value.
Auto-ON
[yes/no] – If yes, device will switch on automatically when immersed in water by at least 0.3 meters (1 ft.).
Auto-OFF
[yes/no] – If yes, the device will automatically power-off, if the water depth is less than 0.5 meters, RECORDING is OFF (HOLD state), and the user did not press any button during the last 5 minutes.
Other settings – Part 2
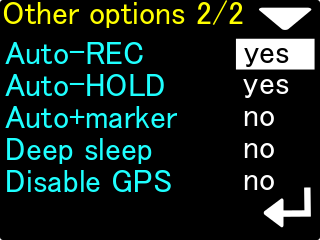
Auto-REC
[yes/no] – The option is enabled by default.
When Auto-REC is off, the ENC console functions as it did in the previous software version. User must manually start data recording (lower button on the main screen with compass) to save information.
When Auto-REC is enabled, the ENC console will automatically detect when data recording should begin.
Automatic data recording will start if all of the following conditions are met simultaneously:
- the ENC console is submerged to a depth at least equal to Depth tresh. (available on the first screen of additional settings)
- The speed sensor detects water flow of at least 8 m / min for a minimum duration of 1.2 seconds. The flow must not be interrupted (no velocity decays).
- The main console screen is currently displayed (the one with the large arrow)
The Auto-REC option is responsible only for starting data recording automatically.
Auto-HOLD
[yes/no] – The option is enabled by default.
When Auto-HOLD is off, the ENC console functions as before. Requires manual stopping of data recording by the user (lower button on the main screen with compass).
When Auto-HOLD is turned on, the ENC console will automatically stop writing data.
Automatic interruption of data recording will occur if at least one of the following conditions is met:
- The depth measured by the ENC console has decreased to 0.2 meters or less.
- The speed measured by speed sensor has dropped below 6 m / min and remains there for at least 1.2 seconds (without momentary speed increases).
The Auto-HOLD function is responsible only for stopping the recording and works regardless of the current content of the device screen.
Auto+marker
[yes/no] – The option is enabled by default.
The ENC console has a built-in mechanism for writing markers. A marker is an additional “highlight” associated with a point on a recorded route. By default, each time you stop recording manually (with the button on the console), the device saves the current marker number in the memory and increases its number by a value of 1 until it reaches 99.
If Auto + marker is turned off, markers will only be saved when you stop recording manually.
When the Auto + marker option is turned on, stopping the recording due to the Auto-HOLD option will cause saving and increasing the marker number. If Auto-HOLD is turned off, Auto + Marker does not work.
Deep sleep
[yes/no] – The option is enabled by default.
The ENC console periodically measures barometric pressure, even when turned off.
This is necessary for the precise calculation of the underwater depth. However, even brief partial wake-ups of the console causes the drain on internal battery power, so even a fully charged ENC console needs to be recharged after about 3-4 months of non-use.
When we enable the Deep sleep option, periodic measurements of atmospheric pressure will not be performed.
It should be remembered that in a few unfavorable cases, the accuracy of the depth calculations may deteriorate. The maximum error of the depth calculation may increase to even 0.8 m, while without saving energy, this error remains in the range of 0.2-0.4 m.
Thanks to the Deep sleep option, the energy consumption of the ENC console during shutdown decreases about 2.5 times, so a fully charged device will maintain the state of charge for up to about 9 months (estimated).
Disable GPS
[yes/no] – The option is enabled by default.
The ENC console has a built-in GPS receiver that works continuously on the surface (when the calculated depth is 0.1 meters or less). The operation of the GPS receiver increases the consumption of battery power while it is on (active).
There are cases where receiving a GPS signal is inherently impossible (e.g. inside caves), so keeping the receiver on is an unnecessary waste of energy.
If Disable GPS is set to yes, the GPS receiver will remain off all the time, regardless of the depth. This will allow the ENC console to work on the surface for approx. 20% longer.
Units
Allows you to choose the units of the values presented on the screen:
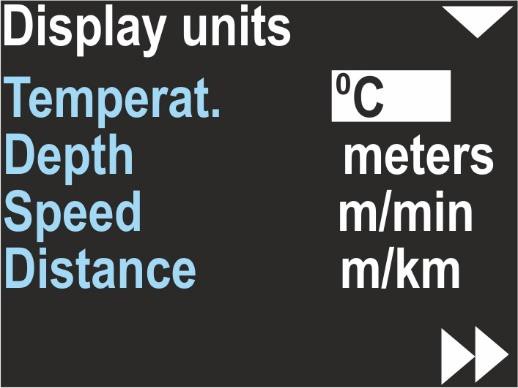
Temperat.(ure)
Can be °C (Celsius) or °F (Fahrenheit)
Depth
Can be meters or feet
Speed
Can be m/min (meters per minute) or knots (nautical miles per hour)
Distance
Can be m/km (meters and above 2000 m kilometers) or US.NM (United States Nautical Mile; 1 US.NM = 1852m) The selected unit is usually displayed near the values on all other screens.
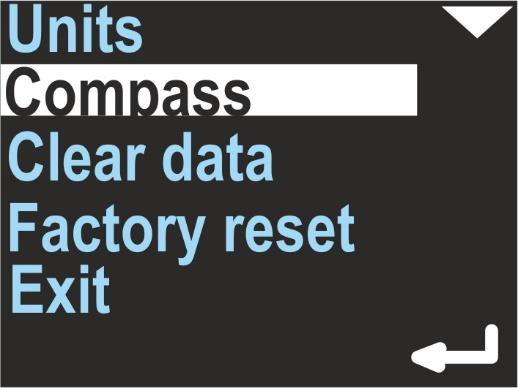
Compass
Allows to calibrate the magnetometer (compass sensor) and to set the magnetic declination and deviation. White text highlighting indicates the currently selected item.
On the left side there is a text description of the function or parameter.
The right side shows information about the function or the parameter value.
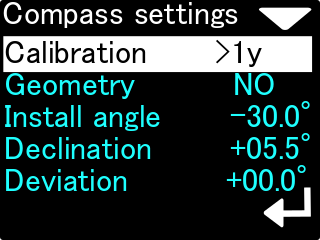
Since this topic requires detailed explanations, please see the separate article about this option.
Clear data
Clears all records from the internal memory. The user will be asked, if he really wants to perform this operation. It is recommended to power off and on the device after using this feature.
Factory reset
After using this option, all settings will be restored to factory values, and all other data will be lost. You may want to use this option if:
- Diving records are invalid / incomplete or lost
- The device is not working correctly and you cannot find good settings
Exit
Exits the settings mode. The device returns to the main navigation screen.