The scooter parameters may be configured individually.
To do so, you will need to activate the scooter’s configuration mode.
Entering the configuration mode
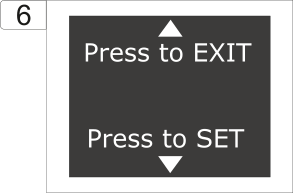
To begin the configuration, hold both buttons on the left and right steering handles and turn on the scooter using the main switch. The OLED display will show screen 6 “Settings”:
In order to choose a function, use piezoelectric buttons (gear buttons).
Information and functions on screen 6
| EXIT | Select to exit the configuration and go back to screen 2A or 2B. |
| SET | Select to go to configuration details on screen 7. |
Selecting the configuration options
In this software version, navigating the DPV menu got significantly simplified.
In order to change the currently modified setting, use gear buttons. In order to modify it’s value- use the DPV triggers (buttons)
Max Power, Motor mode, Reverse – screen 7
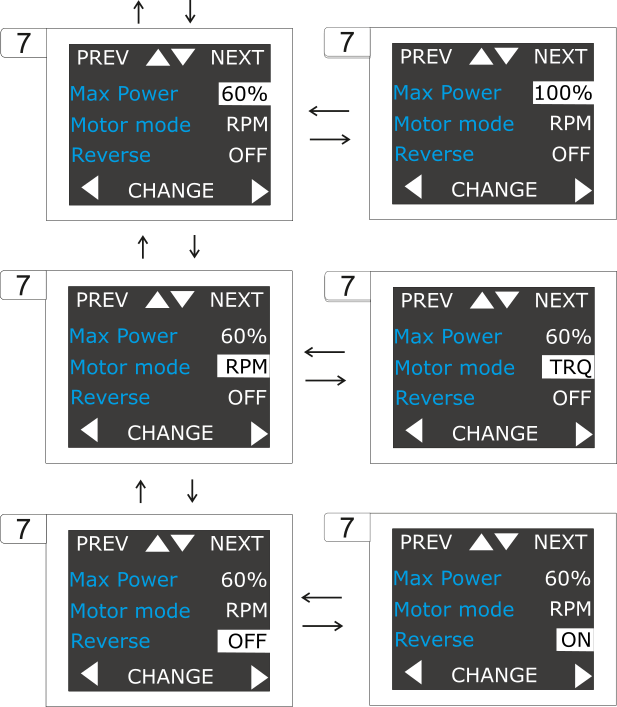
Information and functions on screen 7
| NEXT | Move to the next configuration option listed on the screen. |
| PREV | Move to the previous configuration option listed on the screen. |
| CHANGE | Using the DPV triggers, change the highlighted value |
| Max Power | Selecting the maximum available power level |
| Motor mode | Selecting the engine operation mode. |
| Reverse | Enabling/Disabling the reverse gear |
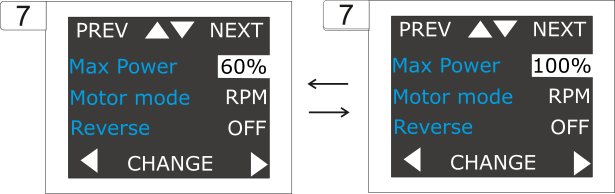
Setting the maximum scooter power
The DPV maximum power can be adjusted beween 60-100%, in 10% steps.
This will not reduce the number of gears, but decrese accordingly the power on each of them to the percentage set.
Only with 100% power set, the gear 9+ (‘+’, booster) will be available.
Selecting the motor operation mode
There are two available motor operation modes. Each of them has different operational purposes, and result in other work of DPV motor.
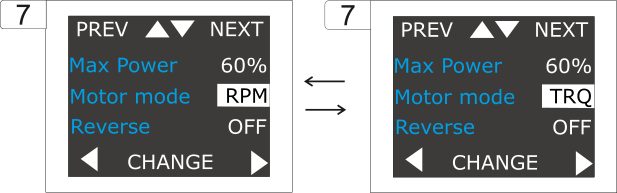
Motor modes
| RPM (Constant RPM) | This is the standard driving mode (known from “model 2017”). The acceleration characteristics correspond to the former setting “fast”. This mode will provide a smooth starting ramp, gradually accelerating the diver to the desired speed. This mode provides RPM control, meaning that the propeller behavior is identical above and below the surface. The bigger the load (more equipment, multiple divers on one scooter), the more power will be directed to the engine, in order to maintain the selected RPM level. |
| TRQ (Constant Torque) | This is a new driving mode, designed for professional users requiring the quickest possible DPV acceleration. It gives the shortest time from pressing a trigger, to feel a pulling power from the DPV. This mode provides torque control, meaning that the engine torque will remain constant – independent of the load on the DPV. The effects of this mode can only be experienced below the surface, when the propeller moves water instead of air and the scooter pulls a load. |
Setting the reverse gear
Reverse gear – one of the Seacraft unique fearures, can be enbled or disabled, depending on the user’s preferences.

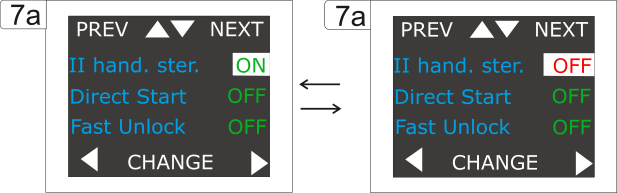
2-hand steering, Direct start, Fast unlock – screen 7a
Next press down reveals screen 7a, and subsequent functions that can be set:
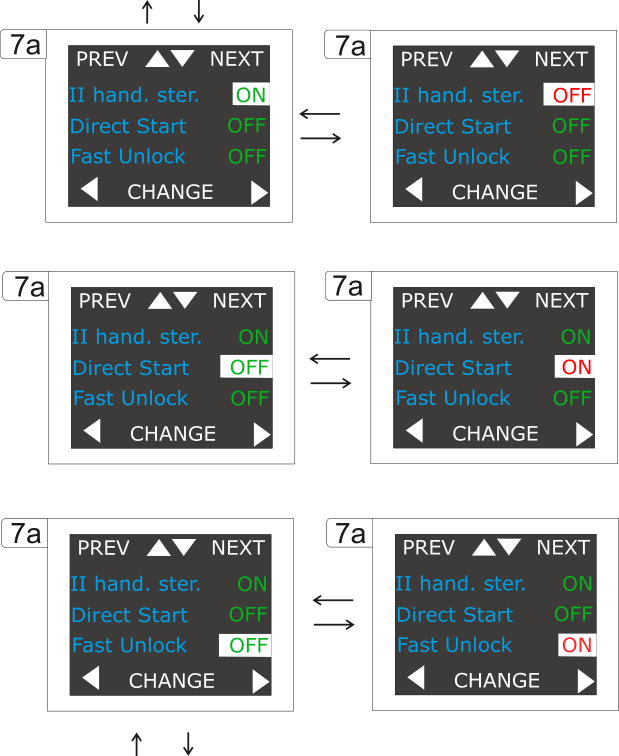
Two-handed steering
Seacraft scooter can be set to activate it’s motor when two triggers are pressed simultanously (recommended, safest option), or with one hand (for special purposes, less safe).
Direct start
The function enables quick start of the scooter after turning the main switch ON. With enabled quick start, screens 2A or 2B will be not displayed, thus allowing user to operate scooter faster after turning it ON.
With Direct start set to OFF, screens 2A or 2B will be displayed on the beginning.

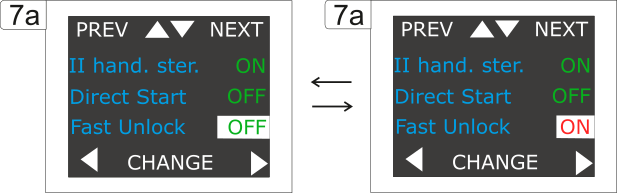
Fast unlock
Fast unlock is performed by fast two presses on any of the DPV triggers, when the scooter returned to the gear 0. (after specified in ‘Time Lock’ function time). This brings back the previously used gear.
Double tap, Default start, Bypass – screen 7b
Next press down reveals screen 7b, and subsequent functions that can be set:
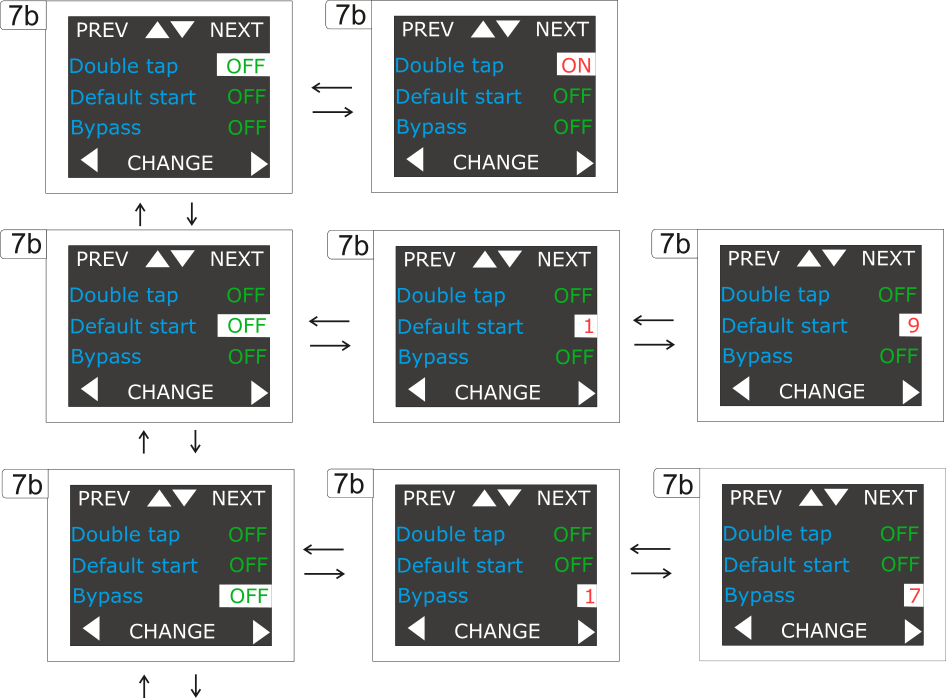
Double tap
Double tap is performed by fast two presses on the ‘free’ DPV trigger, when the other one is pressed, and motor running.
This results in changing the current gear to 9 (if it is in the range 1-8).
Other two taps change the gear to the previously used one.
This allows for fast acceleration – for example to catch the dive partner, and than return to the cruising speed.
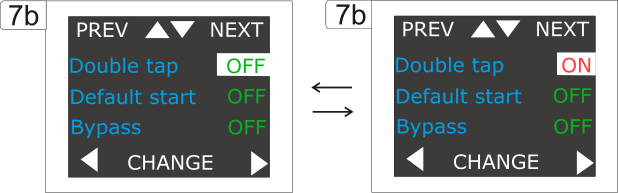
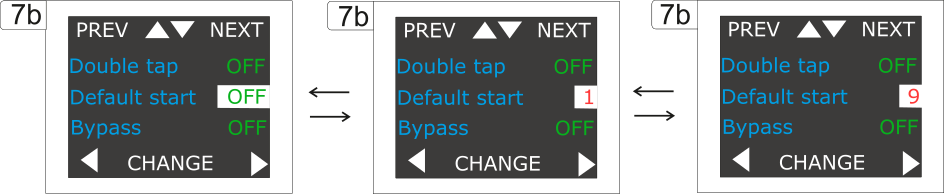
Default start
Default start allows to set a gear which will be set after turning ON the DPV.
This gear will be possible to use immediatelly. Gears in range of 1-9 can be set.
If the Time Lock is set, gear will return to 0 after it’s time.
Bypass
Bypass is a very special functionality, that requires careful explanation and awareness about it’s operation. It is dedicated only to users which life may be in danger in case of scooter malfunction, and unability to return from the dive – as for example cave divers.
During normal operation, DPV is constantly communicating with the display module. If it detects problem with this communication during start-up (as for example display module failure, water entry into display and module damage) it will activate the Bypass and motor controller will start to operate independently of the display module.
Gears 1-7 can be chosen.
If the display module stop to operate during the dive, and scooter stop – turning it with the main switch OFF, and than ON will activate the motor to operate on the chosen gear.
Triggers and buttons will be not operable, and only possibility to operate the DPV is via the main switch.

Time lock, Battery, Language – screen 7c
Next press down reveals screen 7c, and subsequent functions that can be set:
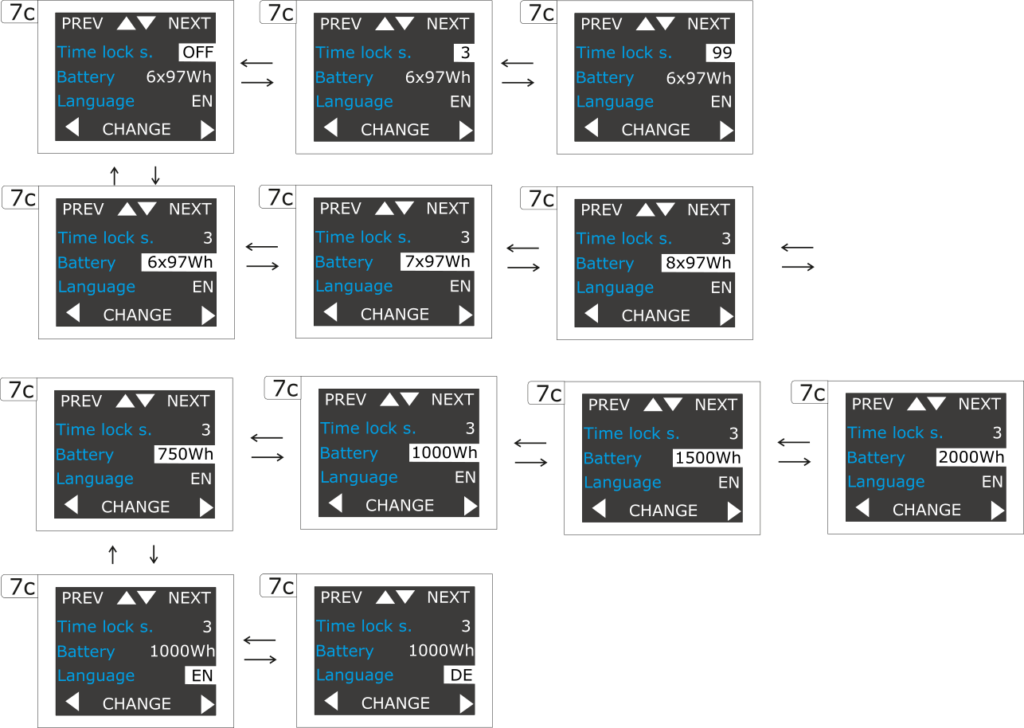
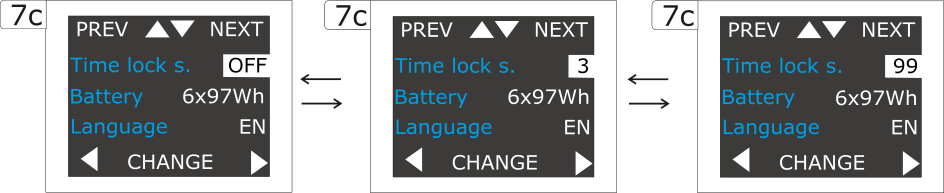
Time lock
Time lock sets the time, after which – in case of not pressing any buttons or triggers – scooter will return to gear 0.
This increases user’s safety, and nivalates a DPV run-out emergency risk.
Time lock can be set in 3-99 seconds range.
Battery setting
The modular construction of Seacraft DPVs allows for a variety of different batteries to be assembled into the same scooter.
In order to display reliable battery % monitoring, and estimated remaining runtime, installed battery need to be set correctly.
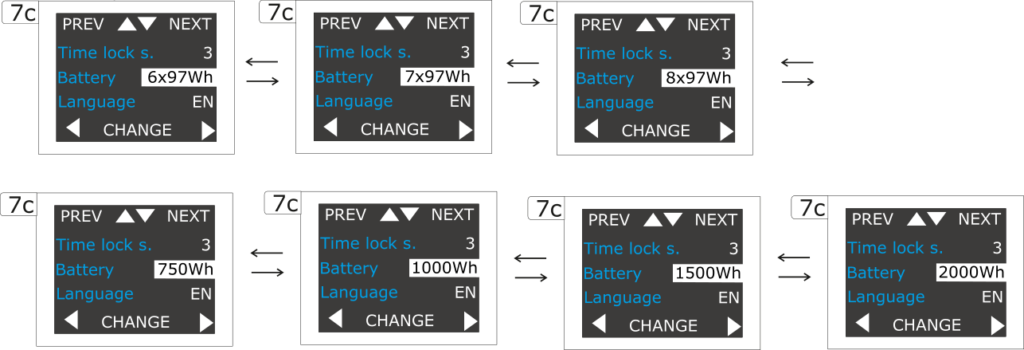
Available batteries:
| 6x97Wh | Air-travel friendly Li-Ion modular battery, with 6 modules installed. |
| 7x97W | Air-travel friendly Li-Ion modular battery, with 7 modules installed. |
| 8x97W | Air-travel friendly Li-Ion modular battery, with 8 modules installed. |
| 750Wh | 750Wh Li-Ion battery, dedicated to Future scooters |
| 1000Wh | 1000Wh Li-Ion battery, dedicated to Future scooters |
| 1500Wh | 1500Wh Li-Ion battery, dedicated to Ghost scooters |
| 2000Wh | 2000Wh Li-Ion battery, dedicated to Ghost scooters |
Language setting
Scooter menu language can be set, depending on the user’s preferences.
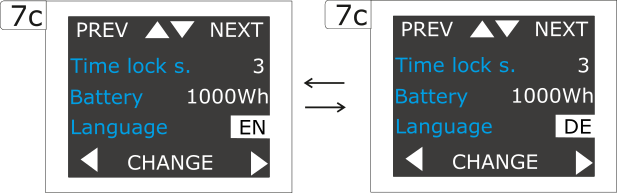
| EN | English – default menu language |
| DE | Deutsch |
Scooter history and general information
Next screen will reveal DPV serial number, software version, and operation history.
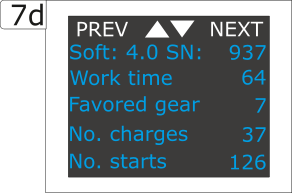
| Soft | Version of installed software |
| SN | DPV serial number |
| Work time | The number of hours of operation. (motor running) |
| Favored gear | The most commonly used gear |
| No. charges | The number of charges of the battery. (counted are moments that battery is connected to the charger) |
| No. starts | The number of starts of the scooter (using the main switch) followed by a motor operation lasting more than one minute |
Exiting the configuration options
To exit the configuration menu, after completing all the settings and their verification, exit the settings menu using the EXIT option:
Error codes for troubleshooting
In case of an internal problem, the scooter will display one of the following error codes:
| COMMUNICATION INDICATION | ERROR DESCRIPTION | DESCRIPTION OF THE USER’S REACTION |
| OV Err | Voltage supply is too high | Charger failure or improper battery connected. Turn off the scooter, unplug the battery, report the problem to service point. |
| UV Err | Voltage supply is too low | Charger failure or improper battery connected. Turn off the scooter, unplug the battery, report the problem to service point. |
| OT Err | Controller temperature is too high | Reduce the swimming speed by two gears. Reduce the load on the scooter. |
| SU Err | Engine blocked during start | Turn off the scooter with the main switch, check if the marine propeller is working properly and if necessary remove the post swirl stator and unblock the marine propeller. |
| FB Err | Engine startup fault, drive feedback loop malfunction | Turn off the scooter with the main switch, check if the marine propeller is working properly and if necessary remove the post swirl stator and unblock the marine propeller. |
| OC Err | The permissible motor current has been exceeded | Reduce the swimming speed by two gears. Reduce the load on the scooter. |
| WATER | Too high humidity of electronics | Check for any damage to the seals and unsealing of the scooter. Report the problem to the service |
| TM Err | Internal data transmission error | Turn off the scooter with the main switch and then turn it on after 10 seconds. |