Technical data
| Model / Parameter | FUTURE BX750 | FUTURE BX1000 | GHOST BX1500 | GHOST BX2000 |
|---|---|---|---|---|
| Working time at nominal speed | >260 min. | >350 min | >525 min | >700 min |
| Working time at maximum speed (gear 9) | >70 min. | >95 min. | >140 min. | >220 min. |
| Maximum distance | >11,7 km | >15,7 km | >23,6 km | >31,5 km |
| Dimensions in mm | 845 x 360 x 410 | 845 x 360 x 410 | 800 x 360 x 410 | 800 x 360 x 410 |
| Housing diameter | 160 mm | 160 mm | 208 mm | 208 mm |
| Weight without battery and ballast | 10 kg | 10 kg | 12 kg | 12 kg |
| Weight with fresh water battery and ballast | 15,9 kg | 15,9 kg | 22,9 kg | 22,9 kg |
| Battery (Li-Ion) capacity | 750 Wh | 1000 Wh | 1500 Wh | 2000 Wh |
| Nominal battery voltage | 32,4 V | 32,4 V | 32,4 V | 32,4 V |
| Maximum battery voltage (after charging) | 37,8 V | 37,8 V | 37,8 V | 37,8 V |
| Minimum battery voltage (after discharging) | 26 V | 26 V | 26 V | 26 V |
| Charger operating voltage | 230 V, 50 Hz, 240 W | 230 V, 50 Hz, 240 or 400 W** | 230 V, 50 Hz, 400 W | 230 V, 50 Hz, 400 or 900 W** |
| Average time of charging 90% | 3 h | 5 h or 3 h | 4 h | 6 h or 3 h |
| Average time of charging 100% | 4 h | 6 h or 4 h | 5 h | 7 or 3,5 h |
| Maximum static thrust | >340 N | >340 N | >340 N | >340 N |
| Maximum speed | >1,6 m/s | >1,6 m/s | >1,6 m/s | >1,6 m/s |
| Maximum depth (std. version) | 150 m | 150 m | 220 m | 220 m |
| Tested depth (std. version) | 250 m | 250 m | 300 m | 300 m |
| Correct displacement (with adjusted ballast) | Neutral | Neutral | Neutral | Neutral |
| Level/Trim (with adjusted ballast) | Neutral | Neutral | Neutral | Neutral |
| Scooter operating temperature*** | -5/+45°C | -5/+45°C | -5/+45°C | -5/+45°C |
| Scooter storage temperature | -25/+50⁰C | -25/+50⁰C | -25/+50⁰C | -25/+50⁰C |
| Temperature whilst charging | +10/+40⁰C | +10/+40⁰C | +10/+40⁰C | +10/+40⁰C |
* Applicable in terms of a diver in a twinset 2×12, in a dry suit, in fresh water.
Range tested for optimal speed.
** Depending on the order.
*** At temperatures below 0⁰C, due to the properties of lithium cells, the battery capacity and hence the scooter’s performance can be significantly reduced.
It is a reversible process – after raising the temperature of the battery to temperature level above 0⁰C the capacity of the battery returns to the nominal value.
Important remarks
The manufacturer claims that the laboratory data relating to the technical specifications of the Seacraft scooter may differ from the data obtained in real operating conditions in the field.
* Applicable in terms of a diver in a twinset 2×12, in a dry suit, in fresh water.
Range tested for optimal speed.
** Depending on the order.
*** At temperatures below 0⁰C, due to the properties of lithium cells, the battery capacity and hence the scooter’s performance can be significantly reduced.
It is a reversible process – after raising the temperature of the battery to temperature level above 0⁰C the capacity of the battery returns to the nominal value.
Basic scooter components, part 1

Drawing 1. Summary of basic scooter components
| 1. Cap nut 2. Cap 3. Housing cover 4. Transportation bracket 5. Housing lid 6. ON/OFF button (left and right) 7. Steering handle 8. Nozzle 9. Marine propeller | 10. Housing seal 11. Power cables 12. Guideway shaft 13. Battery 14. Ballast 15. Cap seal 16. Main switch 17. Charger socket cap |
Basic scooter components, part 2
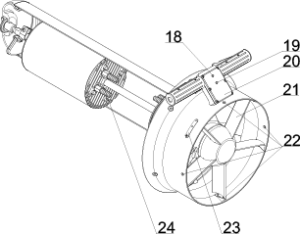
Drawing 2. Summary of basic scooter components
18. Gear up button
19. Gear down button
20. Graphic display OLED RGB
21. Post swirl stator
22. Harness fastening hole
23. Stator lock button
24. Clamp fixing the battery position
Electronic components
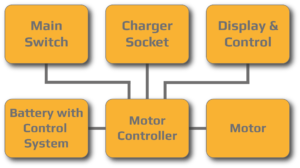
Drawing 3. Scooter block diagram
Motor controller
The brushless motor (BLAC, BrushLess Alternating Current) controller’s task is to produce a three-phase voltage which is used to power the motor. The motor controller communicates with the display and control module in order to obtain information about the chosen gear and transmits information on operating parameters of the scooter display module e.g. the state of the battery, propeller speed, the electricity consumed by the scooter, battery voltage, etc.
Display and control
A modern graphical OLED display RGB is used in the construction of the scooter. The display module contains buttons for controlling the operation of the scooter. All control elements are non-contact.
Main switch
The scooter is equipped with a non-contact sensor responsible for turning the device on and off. Operating the scooter in SWITCHED OFF mode is characterized by very low power consumption, so it is not necessary to unclip the battery from the scooter after each use, and thus it is not necessary to disassemble the scooter every time it has been used.
An exception to this might be transporting the scooter (→ Air and ground transport).
Battery with control system
The scooter is powered by a battery made up of rechargeable lithium-ion batteries.
The scooter battery voltage is always in a safe range for the user. The battery is equipped with a BSM system (Battery Management System), which compensates the voltage across all the cells and a PCM system (Protection Circuit Module) that protects the battery against overload, overcharging and excessive discharge.
Charging socket
The scooter has an external charging socket, thanks to which there is no need to disassemble the scooter in order to recharge the battery.
Battery and charging system
General information
The scooter uses a modern lithium-ion (Li-Ion) battery built with high current cells supplied by a known manufacturer.
Battery parameters
The Seacraft scooter battery has 9 group of cells with a total voltage of 37,8V (value after charging). The voltage level of the battery is secure and compliant with applicable standards. Due to the very high current capacity of the battery use caution when performing any work and manipulations that are associated with the scooter battery.
A characteristic feature of Li-Ion batteries is a natural decline in their capacity, which occurs with increasing amounts of charging and discharging cycles and the passing of time.
Rules for battery charging
Battery life in the original version of the Seacraft scooter is estimated at approx. 300-400 cycles and a period of 3-4 years. After that period, the battery will continue to work, however its capacity may be reduced due to natural battery capacity decrease. To check precisely the condition of your battery, contact your closest service point.
Usage patterns of the scooter and battery charging affect its durability. Adherence to the manufacturer’s guidelines guarantee extend of the battery life and the safety of the scooter usage.
Among other things, the battery charging time depends on the following factors:
- Charger model
- Remaining charge
- Battery state
- Ambient temperature
Charging procedure
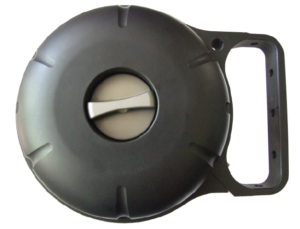
- Unscrew the charging socket cap (→ drawing 1, pos. 17).
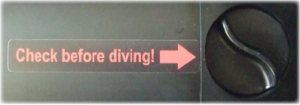
Charging socket cap
- Check whether there are no impurities or traces of moisture in the charging socket
(e.g. as a result of condensation of water vapor). Clean/dry socket and cap as required. - Connect the charger to the power source 230V AC, wait c.a. 30 seconds and turn it on using main switch.
- Plug in the charger plug into the charging socket on the scooter.
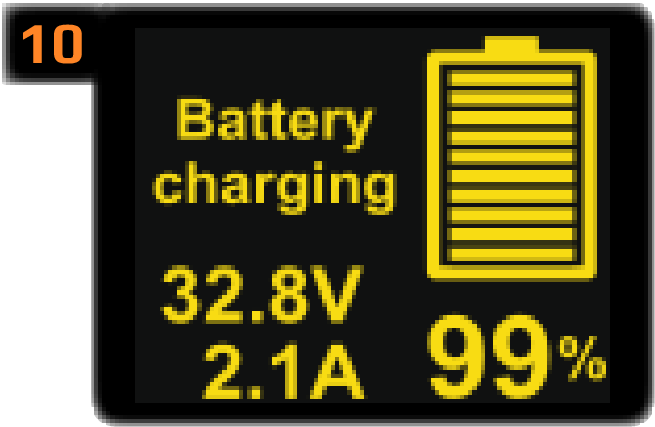
After starting the charging process the OLED display will show information about the percentage of battery charge level with voltage and charging current.
Recommendations for using, maintaining and disposing the battery
The battery should be stored in a cool, dry place; the optimum storage temperature of the battery is approx. 10°C. Storage of the battery at temperatures above 30°C significantly reduces its life.
It is forbidden to store the battery in places exposed to direct sunlight, in heated, closed and unventilated spacer (e.g. vehicles) and near heating appliances.
The factory version of the scooter battery (purchased by the user) is ready for use after the initial charge, which takes place in the manufacturing plant. The manufacturer loads and tests each battery, providing the customer with the battery charged to approx. 20%.
The decrease in battery capacity over time is a natural feature of all batteries, including Li-Ion batteries. The user should keep in mind that over time battery capacity is getting lower, which means that the maximum swimming time with the scooter on a charged battery is reduced. When planning a diving trip with a scooter the user should take into account the wear and tear of the battery.
 | The battery is a product, which after use becomes waste, hazardous to people, animals and the environment. It is prohibited to place used batteries in containers for domestic waste. The used battery is recyclable and should be disposed of in properly labeled containers, dedicated to specialized points of receiving the used electronics, returned to the manufacturer or scooter supplier. |
 | OBSERVE THE AIR TRANSPORT RESTRICTIONS AND WARNINGS FOR LI-ION CELLS AND BATTERIES! |
Transport restrictions
Transferring and carrying Li-Ion batteries of large dimensions using a mass transport is subject to regional and national legal regulations. As a rule restrictions in transport of these items are applicable only in the case of air transport. In the case of transport by land the aforementioned restrictions are not valid. Therefore, each time before sending packages containing the Seacraft scooter refer to local regulations for restrictions on the carriage of certain items or contact your carrier, distributor or the manufacturer of the scooter for detailed information on restrictions on transport of Li-Ion cells and batteries.
| During transportation the battery must be protected against mechanical damage, particularly crushing. Damage of this type poses a fire risk. Never use or carry a battery showing signs of mechanical damage. |
Preparation for use
The scooter is composed of two main elements (→ drawing 1, pos.2)
- The cylindrical part, in which battery and ballast are located.
- The drive unit comprising a body with a motor and an propeller and nozzle with the steering handle. The propeller in the outlet portion is protected by the post swirl stator, which simultaneously provides protection for the propeller while it is working.
It is possible to remove the post-swirl stator and dive without this element but for safety reasons it is not recommended.
Before the dive
Balance and trim of the scooter
The selection of ballast and scooter’s trim is an individual matter, depending on the preferences and needs of the individual user. Please note that the buoyancy of the scooter and thus the ballast weight is dependent on the chemical composition (salinity) and temperature of the water in which the diving will take place.
In order to achieve proper buoyancy and trim of the scooter the user should properly select and distribute the weight of the additional elements of ballast in the form of internal or external scooter ballast (→ Accessories).
The manufacturer provides internal preliminarily balanced and trimmed. The standard equipment of the scooter contains an additional ballast thanks to which the user can ballast and trim the scooter in any water.
When using internal ballast, balance and trim should be performed by appropriate movement of the battery and installation of internal ballast. To do this:
- Stand the scooter up vertically on its nozzle.
- Unscrew the cap nut on the seal and then slide off the housing cover.
Cap nut
- Loosen the clamp fixing the battery position and move the battery in the desired direction. Sign in the form of an arrow with the word UP, should be directed with an arrow towards the steering handle (top of the scooter), the battery with the arrow sign and “Bottom battery” inscription means that battery should be positioned with the arrow down to the scooter.
- Fix internal ballast and / or move to the desired position and fasten the clamp fixing the battery position.
- Check/clean all seals and lubricate them with grease recommended by the manufacturer.
- Replace the housing cover.
- Check whether the seal is under the cap nut; in its absence it should be replaced and then lubricated with grease.
- Tighten the cap nut until the point of resistance.
Assembling the harness
The harness, in the form of link with swivel eye carabiners, should be threaded through the two fastening holes located on the edges of the nozzle. The harness should be adjusted before diving according to the user’s preferences using the harness belt tensioners supplied by the manufacturer. The manufacturer’s original tensioner’s shape allows easy adjustment of the harness length even by a diver wearing thick gloves.
Entering the water with the scooter
Leaving the water with the scooter
Procedure for handling the scooter after completing a dive:
- Turn off the scooter using the main switch by choosing OFF
- Attach the scooter e.g. to the boat ladder
- Pull the scooter out upon coming out of the water or hand it directly to a person on the shore or in the boat, avoid staying under the extracted scooter.
Change alignment
Scooter preparation for the diving season
efore commencing regular use of the scooter you should verify the state of individual structural elements of the device by using the following checklist.
Electrical components
Including:
- Cable and connector
- Plug
- Socket connecting the battery to the scooter electronics
Battery
If the battery has been disconnected from the scooter, connect it, then recharge.
It is recommended that the first use of the battery (after more than six months of inactivity) to perform a full cycle of charging – discharging – charging. This will allow the calibration of the measurement system and to determine the battery condition and charge level.
The discharge of the scooter battery should be done whilst operating the scooter in water (→ Battery And Charging System). Disconnecting the battery does not lose the saved scooter data.
General state of the scooter
Check the scooter inside for any foreign bodies, especially mud and sand. If the structural elements of the scooter contain traces of contaminants, e.g. salt, wipe them with a damp, soft cloth, and then wipe dry. Wash structural elements of the scooter using clean, fresh water. Is forbidden to use detergents and solvents.
Check points on the housing of the scooter, which are in direct contact with the cap and housing cover seals (sealing surfaces). Confirm that they are not deformed, damaged or contaminated. For larger dents or damage of any item of the scooter, especially in case of doubt as to the condition of the sealing surfaces, please contact the manufacturer’s service.
State of seals
Check the seals on the cap on the side of the cap nut – 1 pc., the connection of the cap to the cylindrical section – 2 pc., the connection of the body and the pipe housing- 2 pcs., the charging socket – 1 pc. In the event of damage to the seals, including ribbing, excessive hardness or any other doubts about the correctness of their condition, replace them with new ones using the service kit.
Maintenance steps
Maintaining the scooter after use
After each use the user should:
- Wash the scooter carefully in clean, fresh water.
- Maintain the seals:
- If the scooter has been disassembled into parts – carry out maintenance in accordance with → Scooter preparation for the diving season).
- If the scooter has not been disassembled into parts – maintenance is only required in terms of the charging socket.
Every few dives (especially conducted in difficult conditions), it is recommended to check the condition of the inside of the scooter. It should then verified if there has been no moisture due to e.g. the condensation of moisture when using the scooter in variable temperature conditions.
Periodic maintenance
In the case of using the scooter in particularly difficult conditions, which may lead to contamination of control elements and the propulsion system of the scooter, it is recommended periodically i.e. every few dives to review the general condition of the scooter, seals, the drive unit and control elements similarly to the procedure described in → General state of the scooter. Particularly difficult conditions include, among others, diving with a scooter:
- In reservoirs with high silting, salinisation or contamination
- Close to silty, sandy beds, in narrow caves or wrecks
Maintenance at the end of the diving season
After the end of the season or when not planning to use the scooter for an extended period of time, in order to avoid defects and premature wear as well as in order to ease the operation for the next season it is recommended to perform the following steps:
- Rinse the scooter several times, very carefully in clean fresh water. Then thoroughly dry external components of the scooter with a dry cloth (body, cap, nozzle and housing cover), and gently blowing with compressed air, remove any remaining water from the control parts and the drive unit.
- Disassemble the scooter into parts separating the housing cover with the cup from the body and clean up and possibly dry the interior. Clean the seals and sealing areas.
- Secure the battery – using the guidelines in → Battery and charging system of this manual you should charge the battery to approx. 50% capacity, then depending on the possibilities, disassemble it, or leave it in the scooter unbuckling the power connector. Information about the optimum use, including battery storage is contained in this manual.
- Inspect the drive unit – after dismantling the post swirl stator take off the rotor with propeller pulling them back. Motor elements mounted in the housing, including the rotor bearing and the rotor itself should be cleaned from sand, mud, and other possible contaminants using clean water and then dried. Insert the rotor into the body manually, and then install the post swirl stator.
In case of detection of any faults mentioned in this manual or other problems, the user should repair them using the instructions contained in this manual or consult the problem with the service center.
Assembling / disassembling the drive unit
The power unit of the Seacraft scooter can be easily disassembled. Dismantling of the above-mentioned element should be made if:
- It is necessary to replace the propeller
- Post-season maintenance of the scooter is performed
- In case of unwanted elements entangled in parts of the power unit, e.g. vegetation, rope or vegetation.
Disassembling the power unit
To disassemble the scooter the user should:
- Press the lock button located on the inner circumference of the nozzle, then turn the post swirl stator in a clockwise direction and pull back.
- Remove the rotor and propeller with a turning and pulling back movement.
- Clean all drive unit components of undesired elements or impurities with a stream of clean, fresh water and then dry.
In the case of damage to the propeller it must be replaced using the following procedure:
- Unscrew the propeller screw, which is attached to the rotor
- Discard the old screw
- Insert the new propeller onto the rotor
- Screw in the propeller with a new screw, and secure it with a soft (!) thread-locking agent
- In order to reassemble the drive unit the user should:
- Clean the rotor axis from contamination. Lubricate this element as well as the rotor seat with slide bearings with grease recommended by the manufacturer (refer to Accessories).
- Insert the rotor with a turning movement back into the housing cover.
- Push the post-swirl stator into the places located on the inner circumference of the nozzle, push in the lock button and then turn it counterclockwise to the point of resistance.
Troubleshooting
- The scooter will not start
Symptoms
Discharged battery.
Disconnected cable between the battery and the drive unit.
Method of repair
Check the cable connection between the battery and the drive unit.
Charge the battery.
2. The battery will not charge
Symptoms
Not connected.
Too low battery voltage.
Damaged battery.
Method of repair
Check the battery fuse, contacts, plug and socket and charger are clean.
Measure the voltage at the terminals of the battery. If it is lower than specified as minimum for the type of battery contact the service center.
Replace the battery.
3. The motor does not run or runs unevenly
Symptoms
The motor is dirty or blocked.
Method of repair
Turn off the scooter, remove the post swirl stator, remove the rotor, remove impurities or cause of blockage in accordance with the instructions contained in the manual.
4. Water inside the scooter housing
Symptoms
Damaged seals.
Deformation of the housing elements.
Condensation caused by fluctuations in temperature and humidity.
Method of repair
Remove the old seals, clean the seal surroundings and contact areas of the sealed parts, replace with new seals, grease with lubricant recommended by the manufacturer.
Replace the deformed housing element.
Take the scooter to a dry place. Disassemble the scooter and dry individual components. Do not use the scooter at low temperatures if it was previously assembled in warm and humid conditions. If this is not possible, disassemble scooter earlier so the moisture can evaporate.
5. Problems with control elements
Symptoms
Dirty or blocked control elements.
Method of repair
Rinse the control elements (buttons on the steering handle) thoroughly, wash and wipe with a dry cloth.
6. The scooter sinks or rises towards the surface
Symptoms
Incorrect weight and / or poor placement of the ballast.
Method of repair
Improve the selection of the weight and the distribution of the ballast. If you have problems balancing and trimming, it is recommended to use an external ballast (see the Accessories section of this manual).
After-sales service
Any scooter repairs after the warranty ends are made for a fee. In the case of problems that users are able to correct themselves, the manufacturer provides additional information. Users may contact an authorized service point or the manufacturer of the scooter.
Contact the Seacraft service point at service@seacraft.eu.