Technical specifications
|
Model |
ENC III |
Power source |
Built-in Li-ion 3,7 V battery |
|
Type |
ENC v.3 |
Battery capacity |
5 Wh |
|
Maximum depth |
300 m |
Typical working time |
20-35 h |
|
Tested depth |
350 m |
Average charge time |
<2 h |
|
Depth of start and |
Optional: 0.5, 1 or 1.6 m (compatible with the norm EN 13319) |
Working temperature |
+10 … +45⁰C |
|
Accuracy of depth measurement |
0.3 m in the whole depth range, temp. range: 0…30°C |
Storage temperature |
-20 … +45⁰C |
|
Accuracy of compass |
<5 degrees* |
Temperature when charging |
+10 … +40⁰C |
|
Accuracy of ext. log |
<2%* |
Mounting type |
Universal |
|
Possibility of using above the water level |
up to 5000 m |
Internal storage capacity |
50 routes |
|
Weight / displacement |
290 g / -90 g |
Length x height x width |
95 x 71 x 30,6 mm |
* The accuracy of the measurement depends on the quality of the calibration and the absence of external interference.
Included sensors: 3D magnetometer, 3D gyroscope, 3D accelerometer, pressure sensor, temperature sensor.
Satellite positioning: GPS, Beidou, GLONASS
Data exchange: via Bluetooth 4.2 and/or via USB cable.
Power source: Li-Ion battery cell 5 Wh. Device can use any 5 V DC power source as charger. When charging, it can consume up to 1 A current.
Waste disposal
  | This device contains Li-Ion cells and other materials, which must be recycled properly. |
Mechanical construction
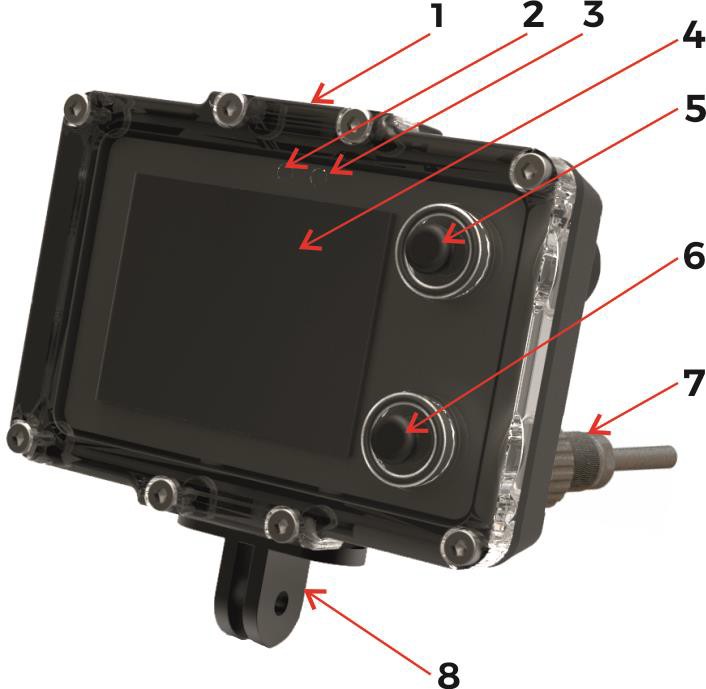 Fig. 1. Description of elements
- Universal mounting – top side
- Ambient light sensor (do not cover)
- Additional LED diode (red color)
- Screen / display
- Top button (NEXT)
- Bottom button (SET, REC, HOLD)
- External socket – for charging and speed sensor
- Universal mounting – bottom side
Control
Button functions (depending on actual screen content):
Top button (5)
NEXT screen / NEXT item / CANCEL change / BACK
Bottom button (6)
SET / change value / enter changing item / switch between REC and HOLD state
This graphical hint is connected with the actual button function. It may be one of the below:
| Move cursor/selection down to next item | |
| Go to next screen | |
| Go to previous screen | |
| Select current item | |
| Cancel or delete | |
| Switch to next available value | |
| Increment current value by 1 |
First steps – switching on and off
Switching on the device
Press both buttons at the same time.
The device will also switch on when immersed in water min. 0.3 m (1 ft) deep.
Switching off the device
You have to stop recording first. Then go to MENU (from main screen –press the top button 3 times, then press the bottom button once). When the OFF command is selected, press the lower button.
The device will switch off automatically when the diving depth is less than 0.5 m and recording is off (HOLD).
Buttons operation
dd
These are custom designed piezoelectric modules integrated into thick polycarbonate front-panel. Rubber “buttons” have indicative function only (easier operation in thick gloves).
Designing a non-magnetic solution that guarantees operation in very wide range of extreme pressures – up to 300 m depth – is not easy task, with ensuring reliability and simplicity. Some “getting used to” their operation is recommended, as ENC3 operating may be different from any other computer-style device you have used previously.
When diving, water pressure around this device is changing slowly all the time. Buttons cannot be sensitive for SLOW pressing/depressing. If so – only RAPID pressing can activate buttons. Thus, to activate button, quick “tapping” action rather than “pressing” is favored.
Modes of operation
Normal operation mode
Default mode after power on. The user sees the current dive parameters, may switch recording ON (REC) and OFF (HOLD), enter settings and view the contents of the device’s internal memory.
Charging mode
After connecting the device to a power source, the charging screen appears. The buttons are inactive in this mode. This mode will be terminated, when the battery is fully charged or the power source is disconnected.
Service mode
When a software update was requested, the device switches to this mode. The screen is blank and the LED above the display is blinking. This mode ends automatically after less than 1 minute.
Guidelines for attaching the ENC to DPVs
When using the navigation console with any DPV, you should carefully choose the mounting point for the device. An unfavorable placement may cause magnetic interferences from your vehicle elements (battery, engine) to the ENC compass sensor.
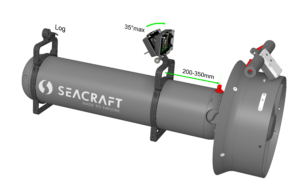
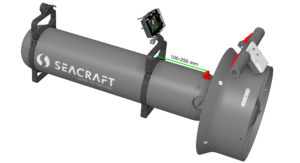
For a SEACRAFT® underwater vehicle, the recommended placement for the navigation device and its speed sensor is shown below:
LIMITATIONS:
- ENC device should be placed at least 0,2 m (7,9”) from any element containing ferromagnetic material (engine, battery), permanent magnets (engine, vehicle handles, speed sensor) or electrical wires connecting the battery with the motor. If this rule is violated, compass indications may be incorrect.
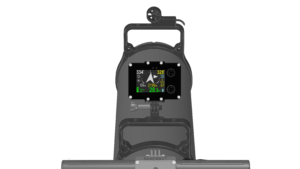
- It is recommended to use Seacraft Transport Bracket as a mounting platform. It allows for lower screen tilt, still keeping it in optical axis of diver, and moves it away from DPV hull and elements inside (as cables, battery) which may influence to the compass readings. This is important especially for Ghost models, which battery is located more in the center of the unit.
- Compass indications may be less stable when ENC tilt (Install Angle) exceeds 35° (from vertical position). If you include your vehicle lean, you should not exceed 35° inclination of ENC device vs vehicle body.
- Speed sensor should be placed away from any elements that can disrupt the flow of water. Front of vehicle is almost always the best choice. Have in mind propeller “sucking” effect, and avoid placing it in the water intake area.
If you need to place ENC device on some other kind of underwater vehicle, you have to find best mounting points on your own, using picture above as guidance.
In order to maintain the correct compass accuracy, it is recommended to always calibrate the compass before diving. Indicated by the compass the direction is calculated from the device measured by the magnetic components of the Earth measured by the magnetometers. These components change depending on the location, local geological conditions (eg the presence of ferromagnetic minerals) and are subject to periodic changes. Large ferromagnetic elements, eg shipwreck, reinforced concrete port quay or steel elements buried in the bottom, also very strongly affect the work of the compass.
A poorly calibrated compass or its disturbed operation can cause significant errors. In the case of a route with a length of 1 km, 5 degrees of compass error will result in an error in the calculation of the target of almost 88 m.
One should also remember about the differences between the magnetic direction indicated by the magnetic compass and the geographical direction that can be read from the maps. The difference between these courses is called magnetic declination and depends on the location. The device allows you to set the magnetic declination and offset this difference.
In order to optimally use the device, it is recommended to familiarize with the theory and principles of navigation in detail.
The log sensor is a precise electromechanical device and must be protected against mechanical impacts and contamination. After the dive, it is recommended to gently rinse with fresh water to cleanse any remaining vegetation or mineral impurities. If it is necessary to make measurements with full precision, it is recommended to calibrate the log every time.
Advanced mounting information
In case you would like to used ENC for very detailed work, for example survey, there is an additional fine adjustment that can be accounted for.
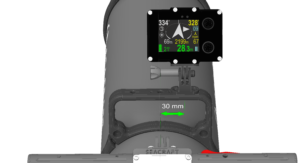
The ENC IMU (inertial measurement unit) is located in its upper left corner. This position is chosen to avoid all possible internal interference. Extended testing has proven that ensuring that IMU position is in the same line, as DPV rotation axis is providing a bit better data – especially regarding the applications where we are fighting for even 0.5% of accuracy.
In order to do this, ENC mounting can be moved to the right, as indicated in the picture below. There is a dedicated accessory that allows to do it on any Seacraft transport bracket expected to be released at the end of 2022.
Installation for other brand underwater vehicles.
If the ENC3M console is to be used on other than Seacraft underwater equipment, please contact the manufacturer to determine how and where it should be installed, and the installation procedure.
To maintain good accuracy of the compass, it is recommended to calibrate it carefully before diving in a new area. The direction of the compass is calculated by measuring the three components of the Earth’s magnetic field. The properties of the magnetic earth field depend on the geographical location, local terrain properties (e.g. soil iron level) and in addition are subject to constant, slow changes over time. Be aware that large steel structure components (shipwrecks, reinforced concrete, etc.) can have a significant impact on the compass.
An incorrectly calibrated compass can cause significant errors in position determination. For example, at a distance of 1 km, 5 degrees of compass error results in moving 88 meters from the planned target.
It is important to remember the difference between the location of the Earth’s magnetic pole (which, in simplified form, indicates the compass) and the actual geographical pole (by which the maps are oriented). This difference is called magnetic declination and changes with longitude and latitude, and over time. The ENC console allows the introduction of magnetic declination in the form of a permanent correction, the value of which should be checked based on current data and location.
In order to properly use the ENC console, it is recommended to familiarize yourself with the theory of navigation basics.
The log sensor is a precise and sensitive electromechanical element. It should be protected against harmful factors: mechanical impacts and pollution. It is recommended to flush the log under a weak stream of fresh water after each dive. This guarantees a long service life of the device. The properties of the log may change slightly over time, especially when it was used in adverse conditions. It is recommended to periodically check the correctness of its indications or carry out calibration.
Best compass calibration results are achieved when calibrating the device underwater, attached to the vehicle. This method may require former additional trainins.
Troubleshooting
|
Symptom |
Cause |
Solution |
|
Device cannot be switched on. Display is blank and no other reactions is observed. |
Excessive battery discharge. |
Start charging battery for at least 30 minutes before attempt to switch on the device. After few minutes, the red led the will start blinking. |
|
Broken device (flooded, charged from improper source), does not react when charging |
Factory service needed. |
|
|
Device is switching on and off continuously. |
One of the internal sensors may be damaged or battery is broken. |
Connect the charger for 1 minute. If this will not help, allow the device to discharge its battery and to switch off. Wait 1 hour, and try to charge it again. If this will not help, return the device for service. |
|
When switched on, the device shows “Battery is low!” message and switches off. |
The battery is discharged too much. |
Charge the device. |
|
The charging process never ends. Battery charge level never reach 90%. |
Broken battery. |
Return the device for service. |
|
Damaged charging cable or dirt/rust on its connector. |
Clean the charger connector. Make sure it is not cut or damaged. |
|
|
Charging source too weak. |
Try another charger. You may use the USB port of a laptop/PC. |
|
|
The depth indication is 0 and never changes. Depth shown is invalid. The device is not switching on automatically when immersed in water. |
Defective pressure sensor. |
Go to Settings / Pressure/salin. If the pressure is near 0, the sensor is defective and factory service is needed. |
|
Pressure sensor gap filled with dirt or mud. |
Wash the device using a mild stream of warm fresh water, until the problem is gone. |
|
External sensor is connected, but no speed is shown. |
Sensor connector misfit, broken or rusted. |
Disconnect the sensor plug, wash and/or clean the connector, connect it again. |
|
The device is switched do INERTIAL operation. |
Go to Settings / Log/Speed, and make sure EXT is set to ‘Active Log’. |
|
|
Compass is showing improper heading. |
Calibration required. |
Perform the calibration as described in chapter 13.1 and 13.2 |
|
Strong external magnetic field near the device. |
Try to remove the magnetic and ferromagnetic elements from the vicinity of the navigation device. Move the navigation device to another location. |
|
|
Defective sensor |
Return the device for service. |
|
|
Compass sensor was overcharged. |
Power off the device. Wait 10 seconds. Connect charger for 10 seconds. Check again compass behavior. |
Before each dive…
Make sure that battery is charged enough. Power on device and check all important settings.
In order to connect the log to the device, check the state of the plug and socket, clean any impurities, check the o-rings, apply a delicate layer of silicone grease and gently but firmly tighten.
Before diving you have to check, if output socket (in the back) is well tightened.
Also you have to make sure, that none of the sealing o-rings is broken or missing.
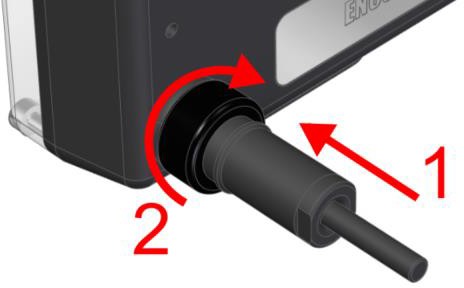
Proper way to fit the connector :
- Push the plug into the socket as far as it can move
- Turn the nut clockwise until you feel the resistance