Software for Android® – installing

Go to Google Play store (https://play.google.com/store), and search for SEACRAFT CONSOLE application. Our application will be marked with this icon: You should download and install it on your device.
Minimum requirements for your mobile device:
| Operating system | Google Android 5.0 or newer |
| Bluetooth link | Version 4.0 or above (4.2 recommended) |
| Internet connection | Required when displaying maps |
You will have to pair the ENC3 console with your device only before first use.
Pairing procedure :
- switch on ENC3 console
- go to MENU > SETUP > Send data
- switch on Bluetooth receiver in your mobile device
- go to Bluetooth settings in your mobile device and scan for nearby devices; look for device named SEACRAFT-XXXXXX (i.e. SEACRAFT- 904101), this name will be also shown on ENC3 screen
- click SEACRAFT-XXXXXX name and wait for pairing, no PIN is needed
Software for Windows®
Installing the software
You will find this software in the download section.
Minimum requirements for your computer:
| Operating system | Microsoft Windows 10 |
| Bluetooth link | Version 4.0 or above (4.2 recommended); not necessary when using USB cable |
| Internet connection | Required when displaying maps |
Using the software
The ENC3 auxiliary software looks and works almost identically on Windows and on Android. In this manual, we will describe Windows version of this software. This software is common for ENC2 and ENC3 devices.
When you start ENC3 auxiliary software, you will see main program window as shown below:
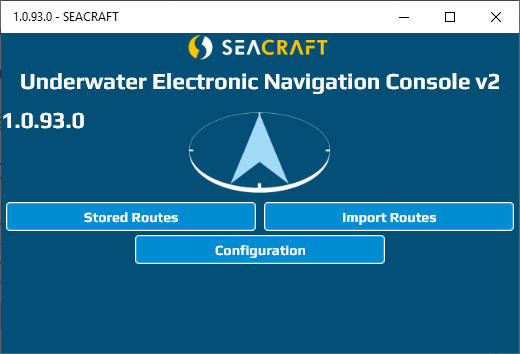
In example above, you can see software version number 1.0.93.0.
You should always include this information when requesting help or reporting errors.
Please always try to get a most recent software version, and keep the program updated.
Some functions are in development stage and will not be described below until finished (marked as ‘in development’).
Four buttons below lead to main program functions.
All menu items are shown in table below as “menu tree”:
| Main window | |
| Stored Routes | View and edit dive data / records |
| Import Routes | Download data into program |
| From File | Download data from other person (i.e sent via email) |
| From Bluetooth Device From Serial Device | Download data from ENC3 via Bluetooth Download data from ENC3 via USB cable |
| Configuration | |
| Units | Choose units for showing downloaded data |
| Upgrade via Bluetooth Upgrade via Serial | Upgrade internal ENC3 firmware using Bluetooth connection Upgrade internal ENC3 firmware using USB connection |
| Manual | (in development) |
| Clear data | Clear all downloaded data |
| Advanced | Other settings (see below) |
| Unlock PRO | Unlock some additional functions (see below) |
You may navigate back in this program using button marked as “<<”.
Importing data from ENC to PC or mobile device
To download data from ENC3, click Import Routes and then From Device button.
On Android, you have to pair ENC3 with your mobile device before this operation (or make sure it was paired before). On Windows pairing is done automatically.
When downloading data from ENC3, program screen will look like below:

Green horizontal bar shows total progress of operation.
Yellow horizontal bar shows progress downloading current item.
Yellow text Device: SEACRAFT-903041 connected shows ENC3 name and status.
Green text Processing 2/7 informs, that 2nd item of total 7 is now processed. When all items are downloaded, this field will show
TRANSFER COMPLETED

Then you can switch off ENC3 and start browsing your downloaded data.
Click the button to go back to main screen.
View/edit imported data
All imported data are available by clicking Stored Routes button on main screen.
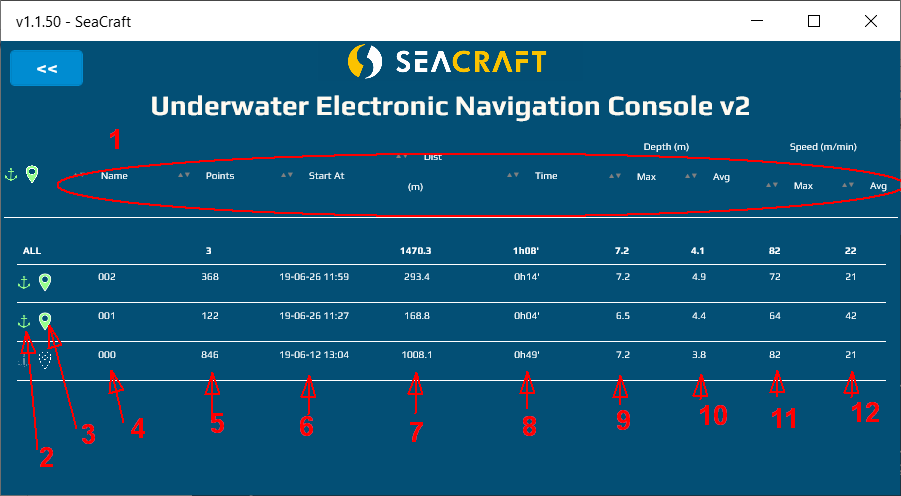
- Headers section. By clicking on each header you can sort data in table ascending or descending
- Green anchor symbol means that this route was anchored.
- Green marker symbol means that route has GPS data, too.
- Route number. Notice that route no. 1 in ENC device is downloaded as item 000,
route no. 2 – as 001, etc. - Total number of records in each route
(1 record = 1 stored set of data : depth, speed, location, …) - Route start time (time of the first record). Format is YY-MM-DD hh:mm.
- Total travelled distance.
- Route time (time between first and last record in this route).
- Maximum recorded depth.
- Average recorded depth.
- Maximum recorded speed.
- Average recorded speed.
When you click on the selected route, screen will show you detailed information about it:
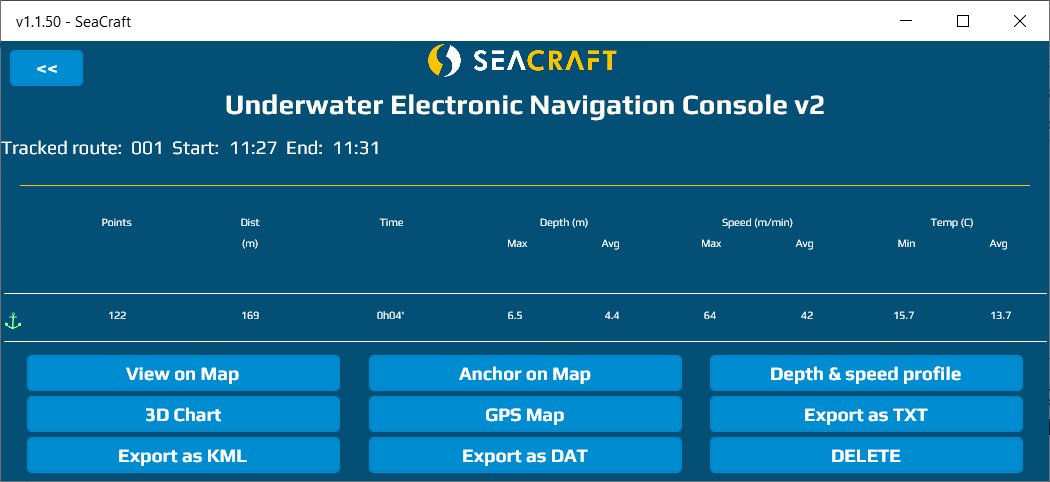
Button roles
DELETE
Delete current (only one) route from this PC or mobile device.
Export as DAT
Swim data (without GPS records) will be stored in native ENC3 format (for helpdesk or support purposes).
Export as TXT
Swim data (without GPS records) will be stored as text CSV file
(you may import it to any spreadsheet program for further calculations).
GPS map
Shows all GPS records (only) on map – as points connected with lines.
3D Chart
Shows swim records as 3-dimensional graph.
Depth & speed profile
Shows in graphical form depth and speed data as shown below:
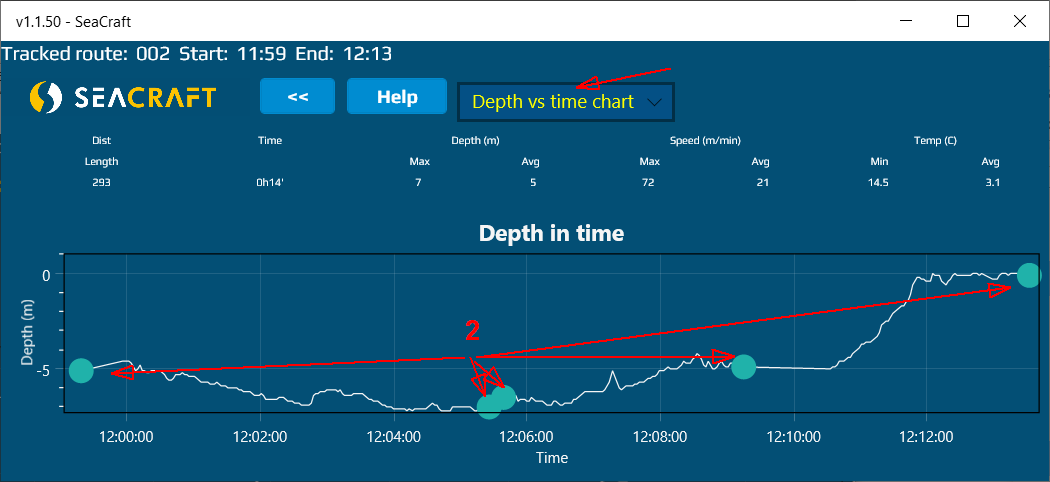
- With this field you can switch between 3 graphs:
depth vs time, depth vs distance and speed vs time - This blue point shows each marker
(point where you switched between REC and HOLD state while using ENC3)
Anchor on map
ENC3 device records route as set of relative positions.
If you want to show this route on any map, you have to manually set the “first point location” – by clicking it on the map. It should be this point, where you press REC first time.
If you press this button, you will see the empty map. It’s recommended to click in any point of the map first. This will be the first (but invalid) anchor position. Then you may move the map by clicking and holding it. Use Zoom-in and Zoom-out controls to get appropriate scale for your operations.
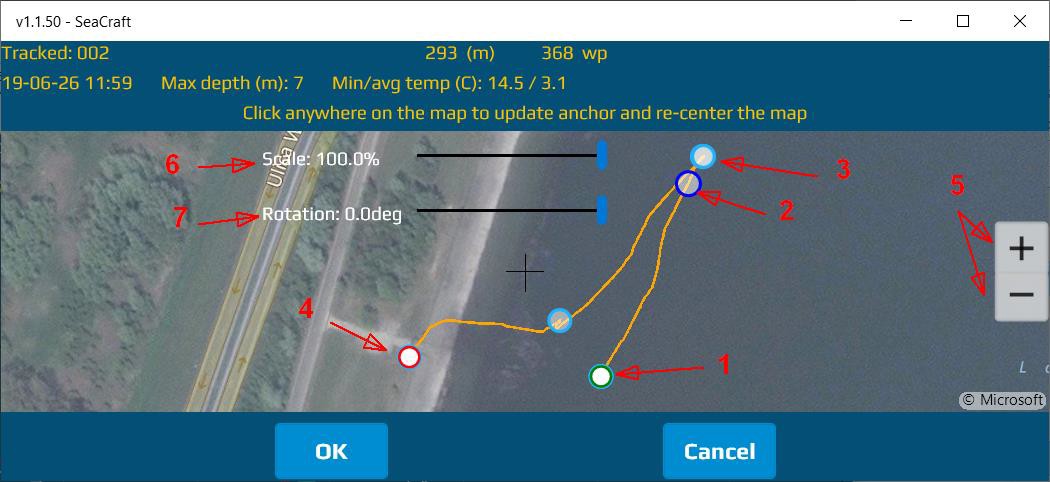
- Route starting point (green circle)
- Route max depth point (dark-blue circle)
- Marker point (light-blue circle)
- Route end point (red circle)
- Zoom In/Out controls
- Scale fit slider
- Rotation slider
View on Map
allows to show current route on map. It looks almost the same as when anchoring route, but without Scale and Route controls.
Configuring the auxiliary software
Units
This option allows to change display units, but in this application only. ENC3 has his own display units settings and it is independent.
Upgrade
Allows ENC3 firmware update.
Manual Clear Data
This option allows to delete all data imported from ENC3 from this application database. This option does not affect internal ENC3 memory, only downloaded records.
Advanced
Please do not change this options from its default values, unless asked by our technical support.
Unlock PRO
This software can be used also with other version of ENC3 console, specialized for less common tasks. For this ‘special’ versions of ENC3 some additional settings are required and you may unlock it using this option. Ask our support for unlocking code, if you have this ‘special’ versions of ENC3 console. Users of regular ENC3 device will have no reasons to access this options.
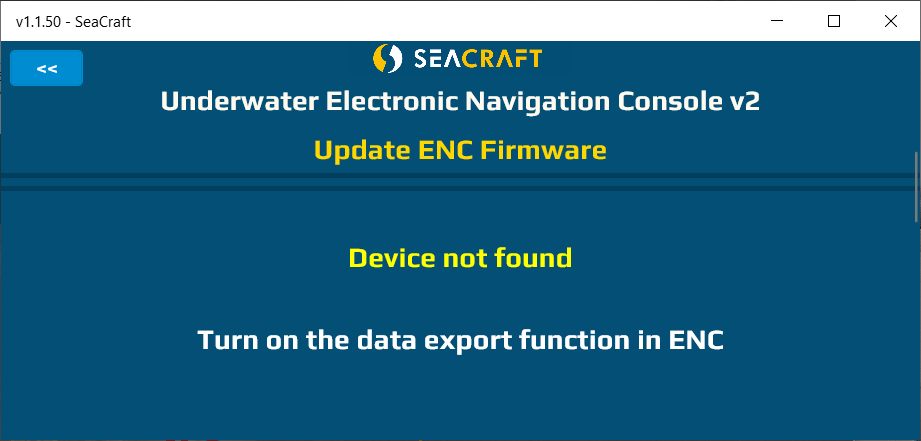
ENC firmware update
To use this feature, you will have to download a new firmware file.
You will have to copy received file to the device (PC or mobile device) when this auxiliary software is installed.
Before starting the update process:
- Make sure ENC3 is charged at least to 50%
- Make sure your PC or mobile device is charged enough to work for 15 minutes or more
- Go away from any strong electromagnetic field sources, which can disturb wireless connection (microwaves, electric motors, etc.)
- switch on ENC3 device and go to the MENU > SETUP > Send data (inside ENC3), then connect the data cable between your ENC3 and your PC (if you’re planning to use USB for the data transfer)
- Start auxiliary software and select Configuration > Upgrade via Bluetooth or Configuration > Upgrade via Bluetooth
Depending of you preferred communication medium:
- Select the ROM file which you received from us.
DO NOT try to use any other file in this option. - Make sure no other application on your PC or mobile device will disturb update process.
If you carry out all this steps correctly, you will see screen like below:
And after a while…
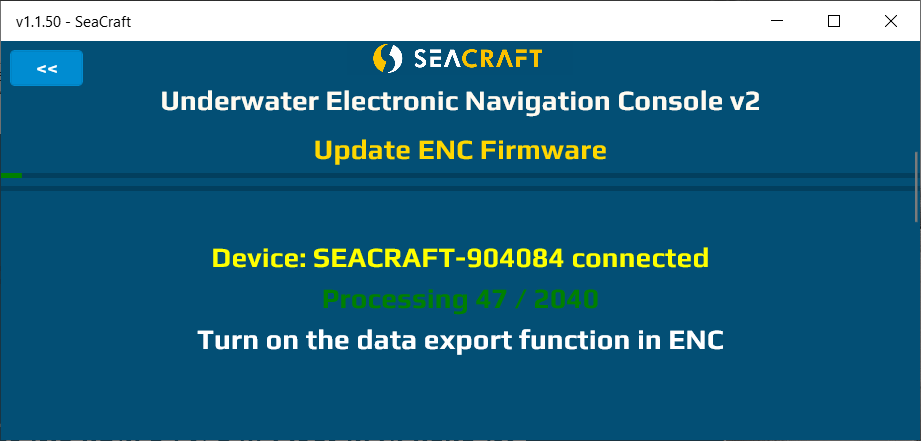
After all data was sent to the ENC3, display of your console will be switched off, and red LED diode above it will blink for 10 seconds.
After that, your ENC3 should switch on automatically.
Troubleshooting the firmware update
| Symptom | Procedure |
| Update process hangs and progress bar doesn’t increment for more than 1 minute | Press STOP on ENC3 device to break data transmission Close PC / mobile application and start all update procedure again from the beginning |
| Firmware was not updated (software version shown in ENC3 didn’t changed) | Update file was corrupted during transmission and rejected by ENC3. Repeat update procedure from the beginning. |
| Compass not working properly | Compass sensor was overcharged during update process. To fix it : Switch off ENC3, wait 10 seconds and connect to charger for 10 seconds, or Leave ENC3 switched on until battery is totally discharged, and then recharge ENC3 |
The update process may take 2-3 minutes when using software installed on Windows 10 PC (5-6 minutes when using Android devices).