Introduction
The 4.0 software introduces several new, unique functionalities as compared with earlier versions. Make sure to read the chapter about DPV software configuration first, to learn about Bypass, Default start and other new functionalities.
Starting the scooter
The scooter is equipped with a contactless main ON / OFF switch located in front of the nozzle on the cylindrical part of the scooter (→ drawing 1, pos. 16).
Turn on the scooter using the main switch (→ drawing 1, pos. 16) by choosing On.
After setting the switch to the On position, on the OLED display located on the handle of the scooter the following will appear in sequence:

Manufacturer logo
 |  |
Abbreviations used in screen 2A and 2B
| Max power | Maximum power of the scooter set by the user Possible range: 60-100% (→ Setting the Maximum Scooter Power). |
| Dynamics | Drive characteristics: Constant RPM / Constant Torque (→ Setting the Drive Dynamics). |
| Time lock | Time set by the user, after which the release of the handle will automatically block the scooter by selecting gear [0] (possible range: 3-60 seconds) and transiting to Standby mode (→ Setting the Security Options – Time Lock). |
| Two-handed – screen 2A | The control mode set by the user – scooter controlled with two hands (→ Setting the Security Options – One-handed / Two-Handed Steering). |
| One-handed – screen 2B | The control mode set by the user – scooter controlled with one hand (→ Setting the Security Options – One-handed / Two-Handed Steering). |
Methods to control the scooter
The user may choose from these control methods:
– Two-handed steering – The scooter is controlled with two hands
– One-handed steering – The scooter is controlled with one hand
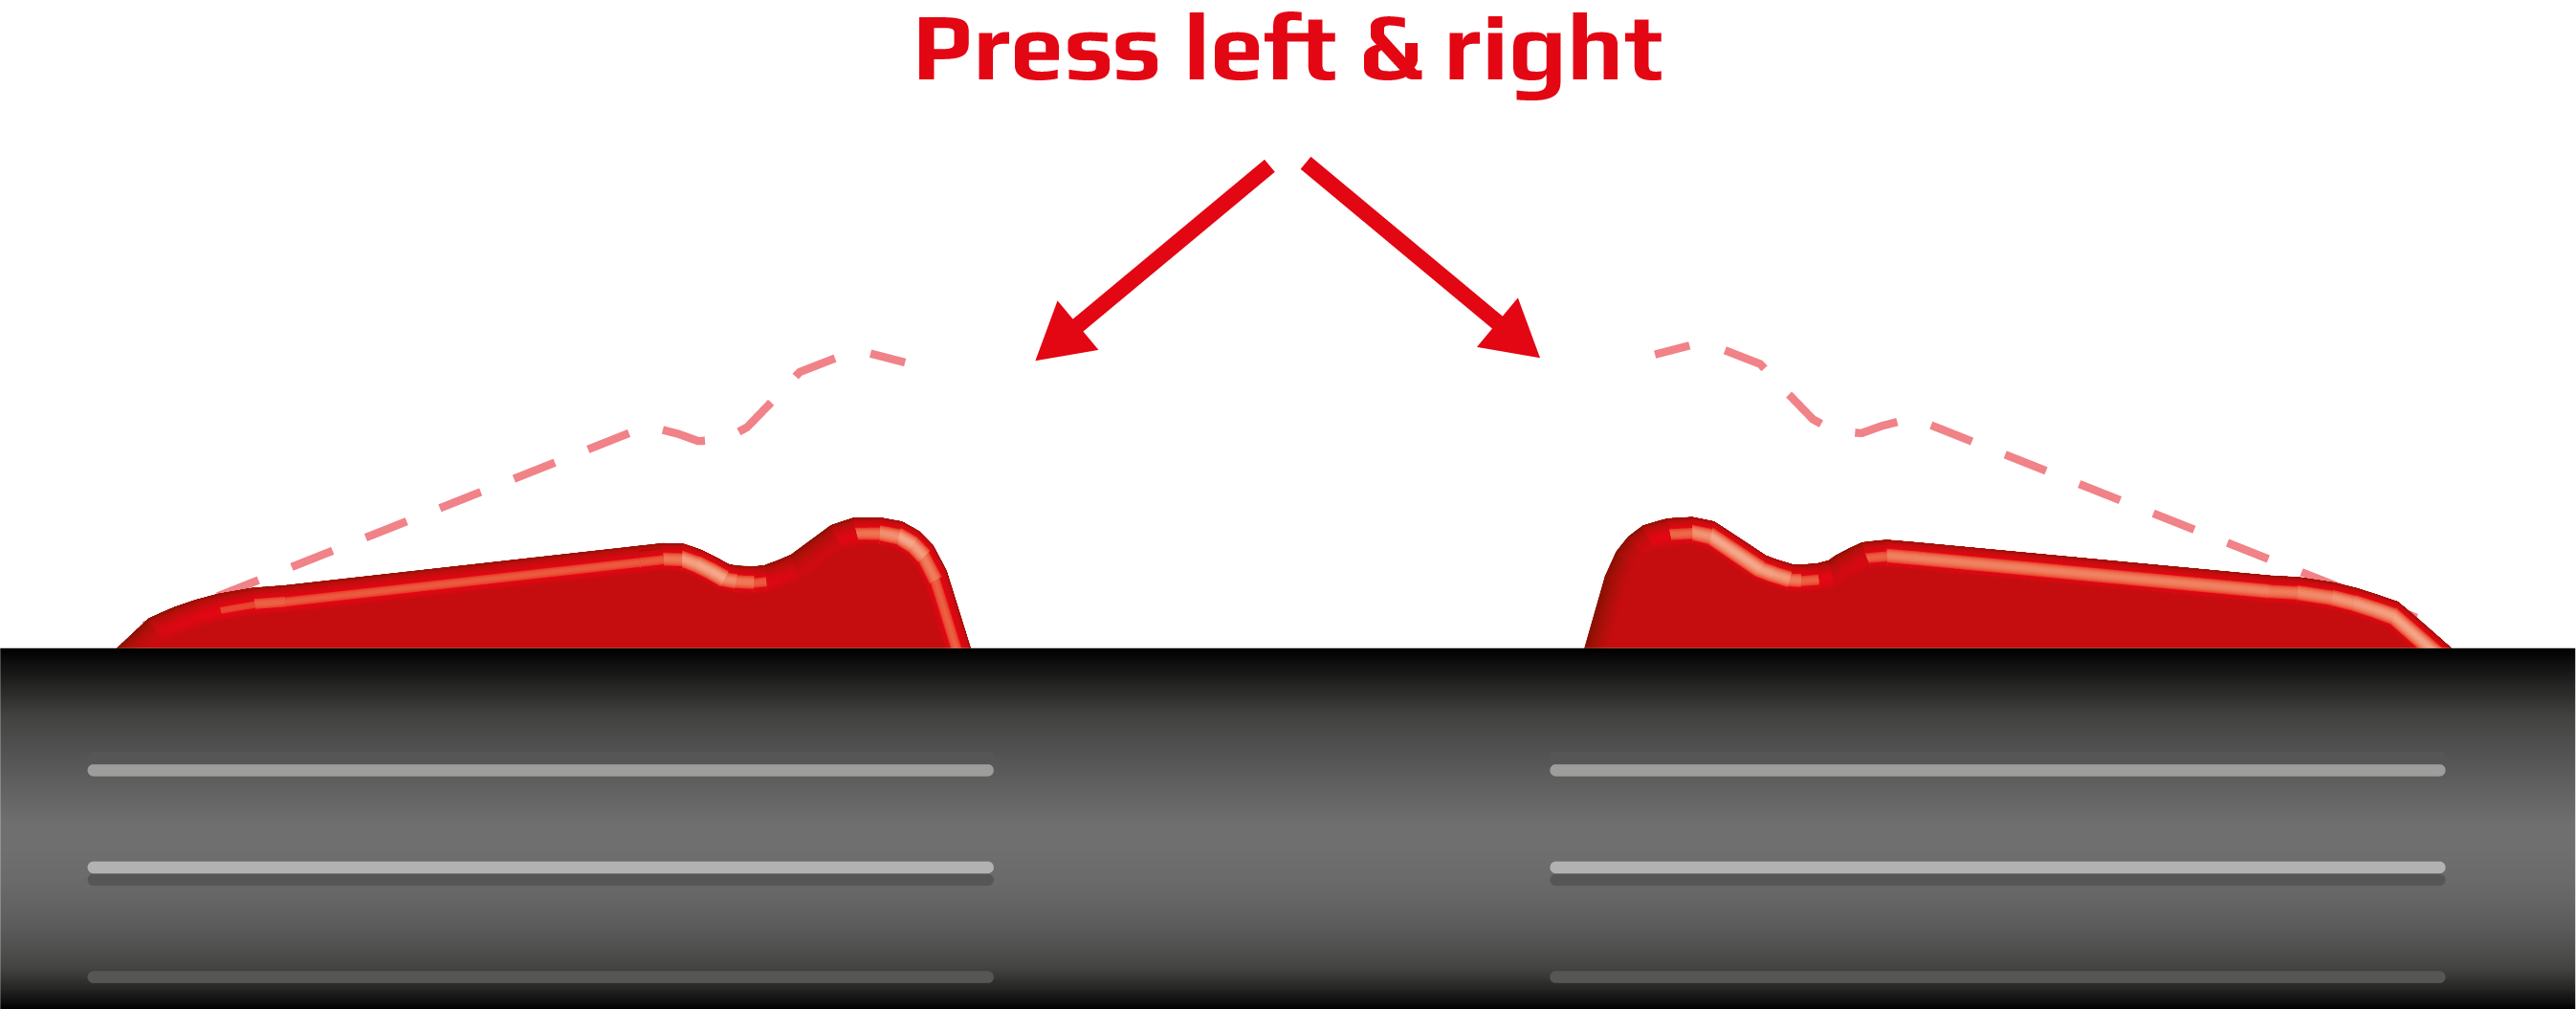
Selecting the “Two-handed” mode means that to turn on the motor of the scooter the user must simultaneously press the buttons on the left and right side (→ drawing 1, pos. 6) of the control handle.
In order to be able to use the scooter with one hand (variant indicated on the display of the scooter as “One-handed”) the factory settings must be changed. Information about changing the default setting to “One-handed” appears on the display screen as the red warning “One-handed”. For a description of how to change the mode (→ Setting the Security Options – One-handed / Two-Handed Steering).
2 steps to start driving
For safety reasons, the process of starting the scooter requires 2 steps:
- Activating the machine with the main switch introduces the scooter in Standby mode and does not allow the scooter to work.
In order to start the scooter’s motor it is necessary to select gear [1-9] or reverse gear [R] and to press any button (One-Handed mode) or both buttons (Two-Handed mode) on the scooter steering handles (→ drawing 1, pos. 6, 7).
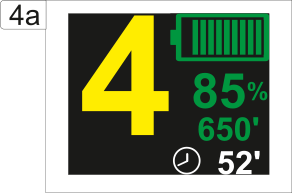
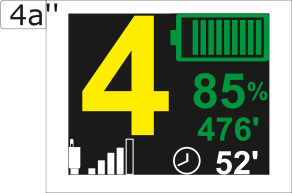
Initial DPV screen
After starting, there will be an initial DPV screen displayed.
Depending if power converter is installed, DPV will automatically detect it and display screen 4 (no power converter), or 4′ (power converter installed).
 |  |
Turning the optional power converter on
In order to activate the power converter, first ensure that you did follow it’s operational manual and all is correctly configured. Then:
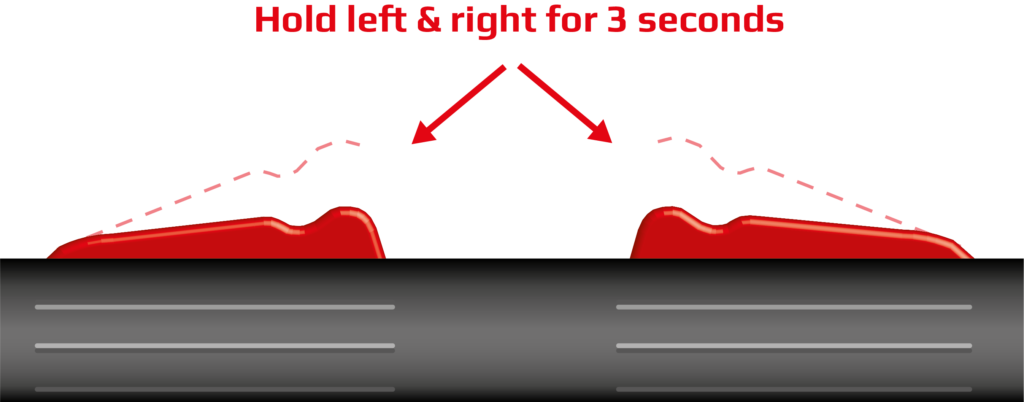
Put the scooter in gear 0, and simultaneously hold the two buttons on the scooter steering handles for 3 seconds (→ drawing 1, pos. 6, 7).
After completing the above steps, screen 11 (Power converter power level) is shown on the display:
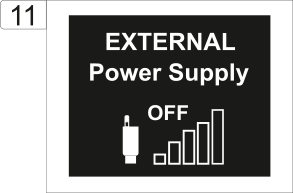
In order to turn the power converter on, and choose it’s output voltage, use piezo buttons for power level selection. Piezo buttons (→ drawing 2, pos. 18, 19) are located directly above the display (→ drawing 2, pos. 20).
Setting the scooter gear
The scooter is capable of operating in “10 + 2” gears (gear [0-9], overspeed [+] and reverse [R]). After starting, the scooter normally is in Standby mode (gear [0] – if Default Gear is not set otherwise) in which the scooter motor does not run. Shifting gear is possible using two piezo buttons (→ drawing 2, pos. 18, 19) located directly above the display (→ drawing 2, pos. 20).
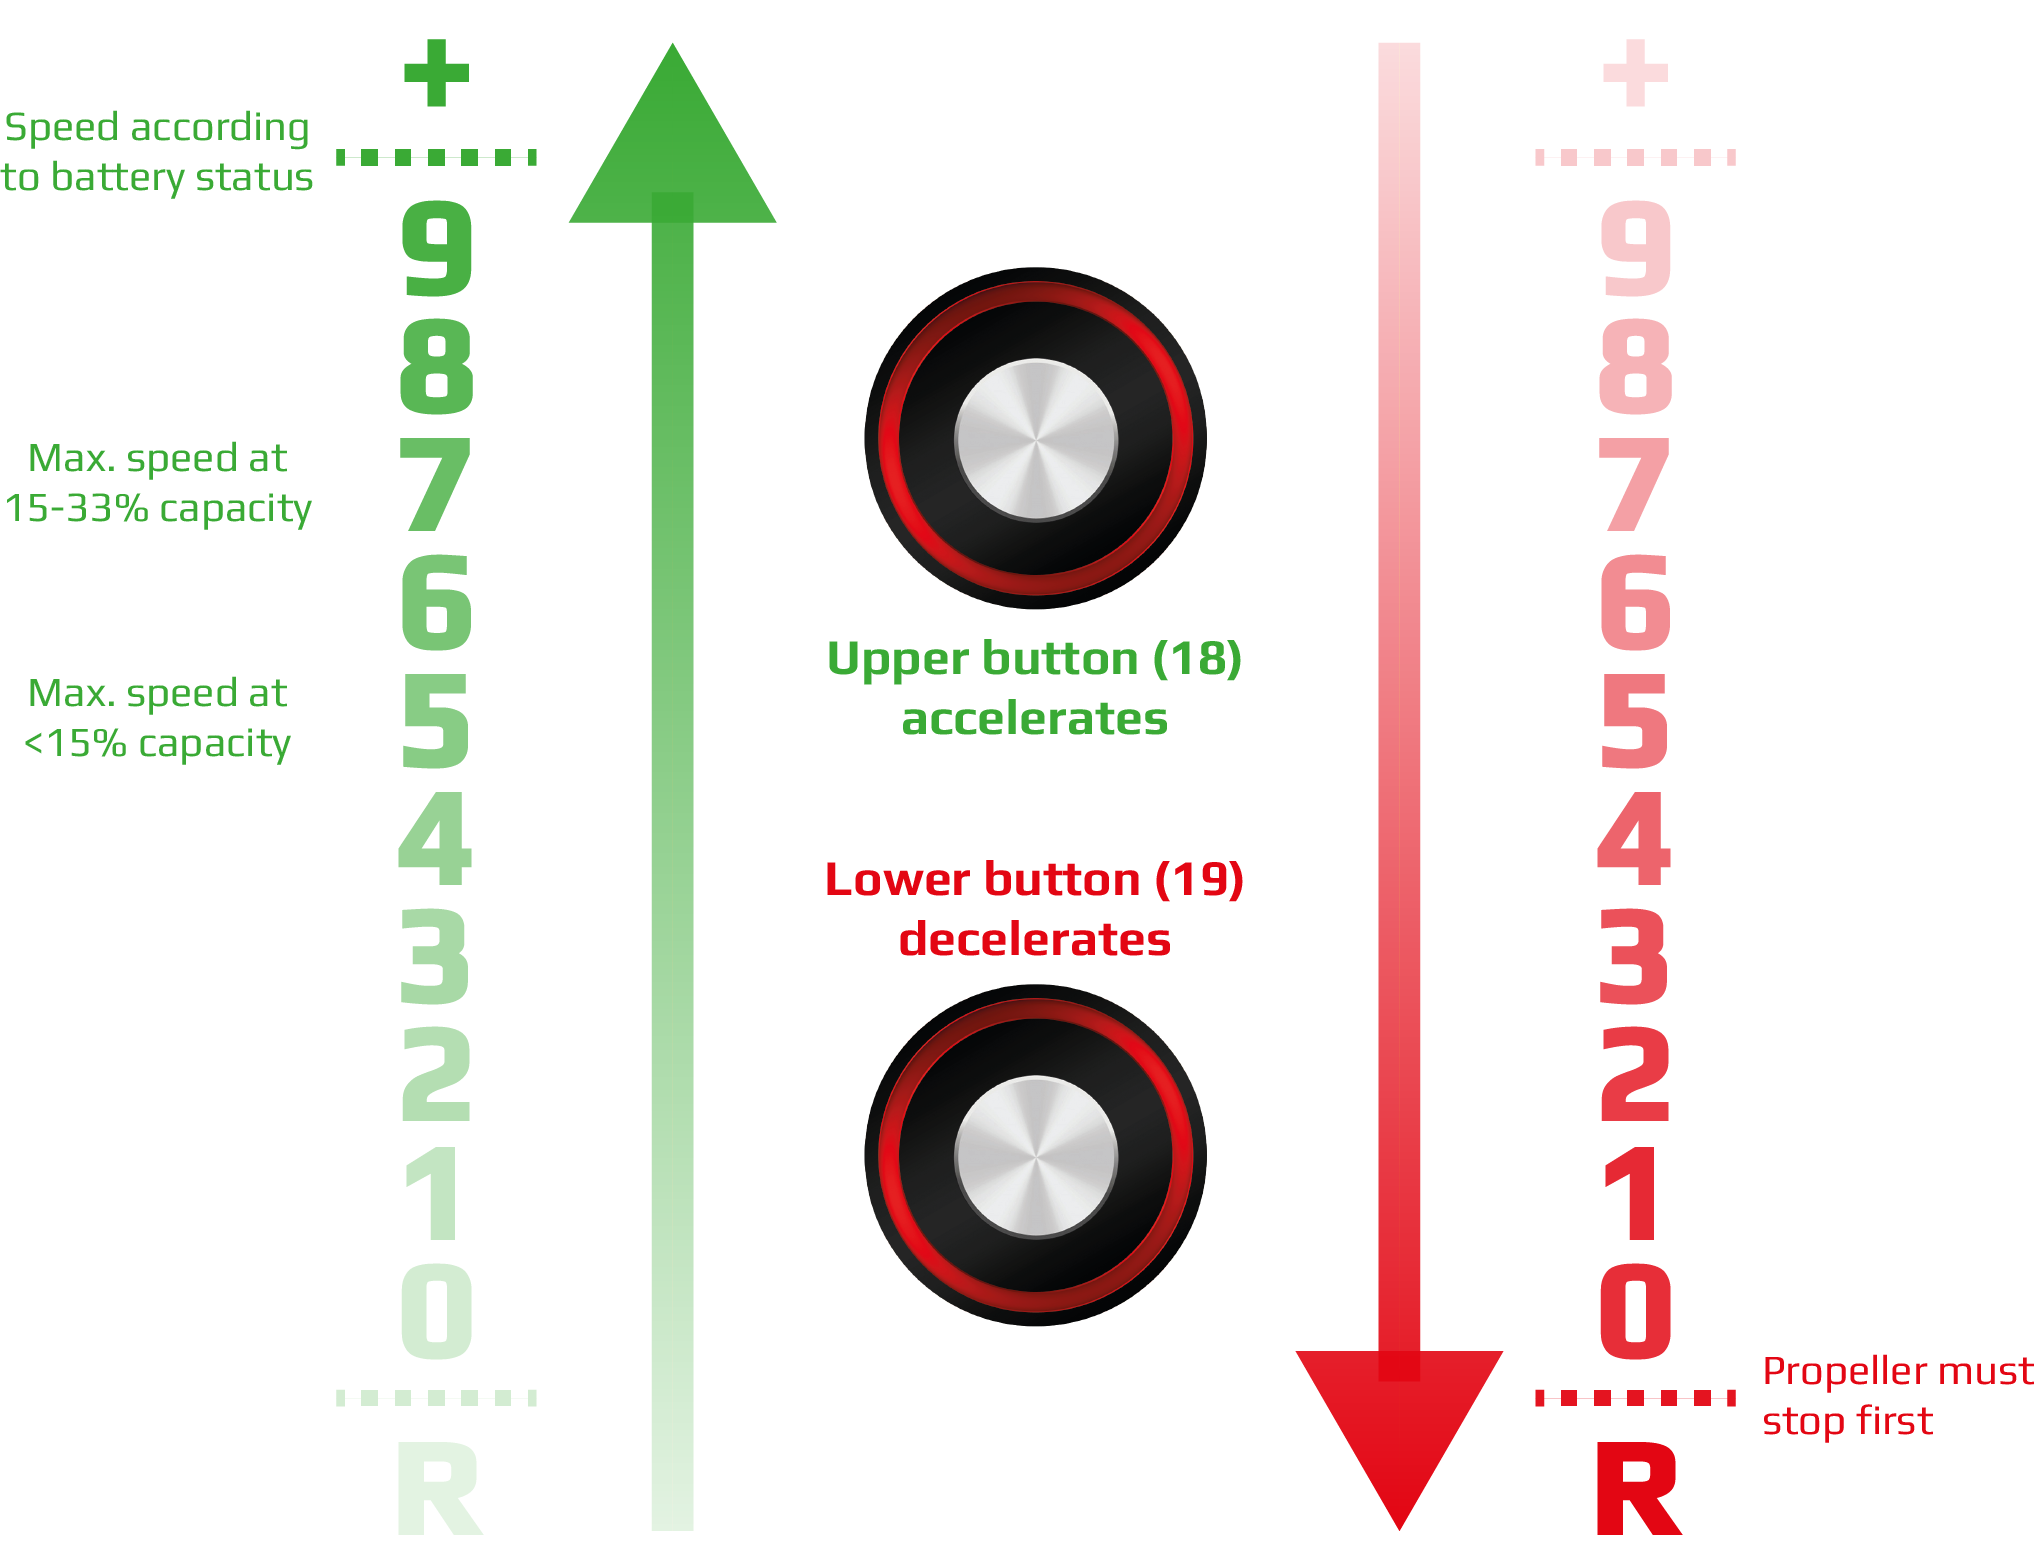
Pressing the top piezo button (→ drawing 2, pos. 18) causes the gear to move higher and pressing the bottom button (→ drawing 2, pos. 19) will lower it. Each pressing changes the gears by one step.
Capacity-dependent maximum gear
For the safety of users, to optimize the scooter’s energy consumption, and to extend the its range, the motor controller will possibly limit the maximum available gear:
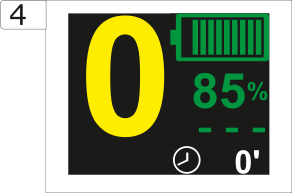
- At 34-100% of the available capacity of the battery, the battery on the screen 4 is green, it is possible to run in every gear.
- At 15-33% of the available capacity of the battery, the battery on the screen 4 turns orange, it is possible to run in maximum gear [7].
- With less than 15% of the available capacity of the battery, the battery on screen 4 turns red and it is possible to run in maximum gear [5].
Overspeed gear (Booster/ ‘+’)
The scooter provides you with a special overspeed gear [+], that uses all available power to drive the propeller to the maximum RPM (revolutions per minute) possible in the given situation.
The overspeed gear [+] can be activated by pushing the button 18 (gear up) while running in gear [9].
Reverse gear
The reverse gear [R] is a Seacraft specialty, unknown to other scooters on the market.
Using this gear faces you with new challenges, so make yourself familiar with them (→ And Yet One More Seacraft Specialty: The Reverse Gear).
The reverse gear [R] is only available after setting gear [0], when the propeller has stopped, and pressing button 19, without any of the triggers pressed.
Automatic re-set to Standby mode (Time lock)
Leaving the scooter without any operation (no presses on the buttons / and the steering handle triggers) for a period longer than the preset auto-lock time (“Time Lock” function) will automatically set the scooter into gear [0] in Standby mode.
Seamless gearshift
Changing the scooter gear happens smoothly (without any jolt).
Starting the motor
After setting a gear, the motor can be started, depending on the selected mode.
Screens during driving
 |  |
Estimated remaining run time, based on the current engine load will be displayed below battery % number.
The internal electronics measures the average current drain, and every 6s it will calculate how many minutes of driving time remains at this level.
If the power converter is activated, it’s power drain will be incorporated into the remaining burntime calculation.
Clock icon and white number indicates the trigger time – how many minutes in total the DPV was running.
The calculation is based on measuring the estimated remaining battery capacity, taking into account the installed battery type (which must therefore be chosen carefully in the settings).
The displayed remaining runtime is only indicative and should not be used as a basis for any decisions, that could influence your life. Remember to abide by all dive-planning rules learned in your DPV training.
However, should you have to re-plan your dive on short notice or encounter an unusual situation (e.g. towing a partner in variable currents), the remaining run time might be a critical tool, supporting you in selecting the optimum speed.
Two-handed mode
In case the user chooses control with both hands (Two-Handed mode), the scooter can be operated only with both hands, i. e. the user needs to press both buttons to start the engine (recommended for beginners).
One-Handed Mode
In case the user chooses control with only one hand (One-Handed mode) the scooter can be operated with one hand or both hands. This mode implies that to start operating the scooter can be done by pressing either button on the steering handle.
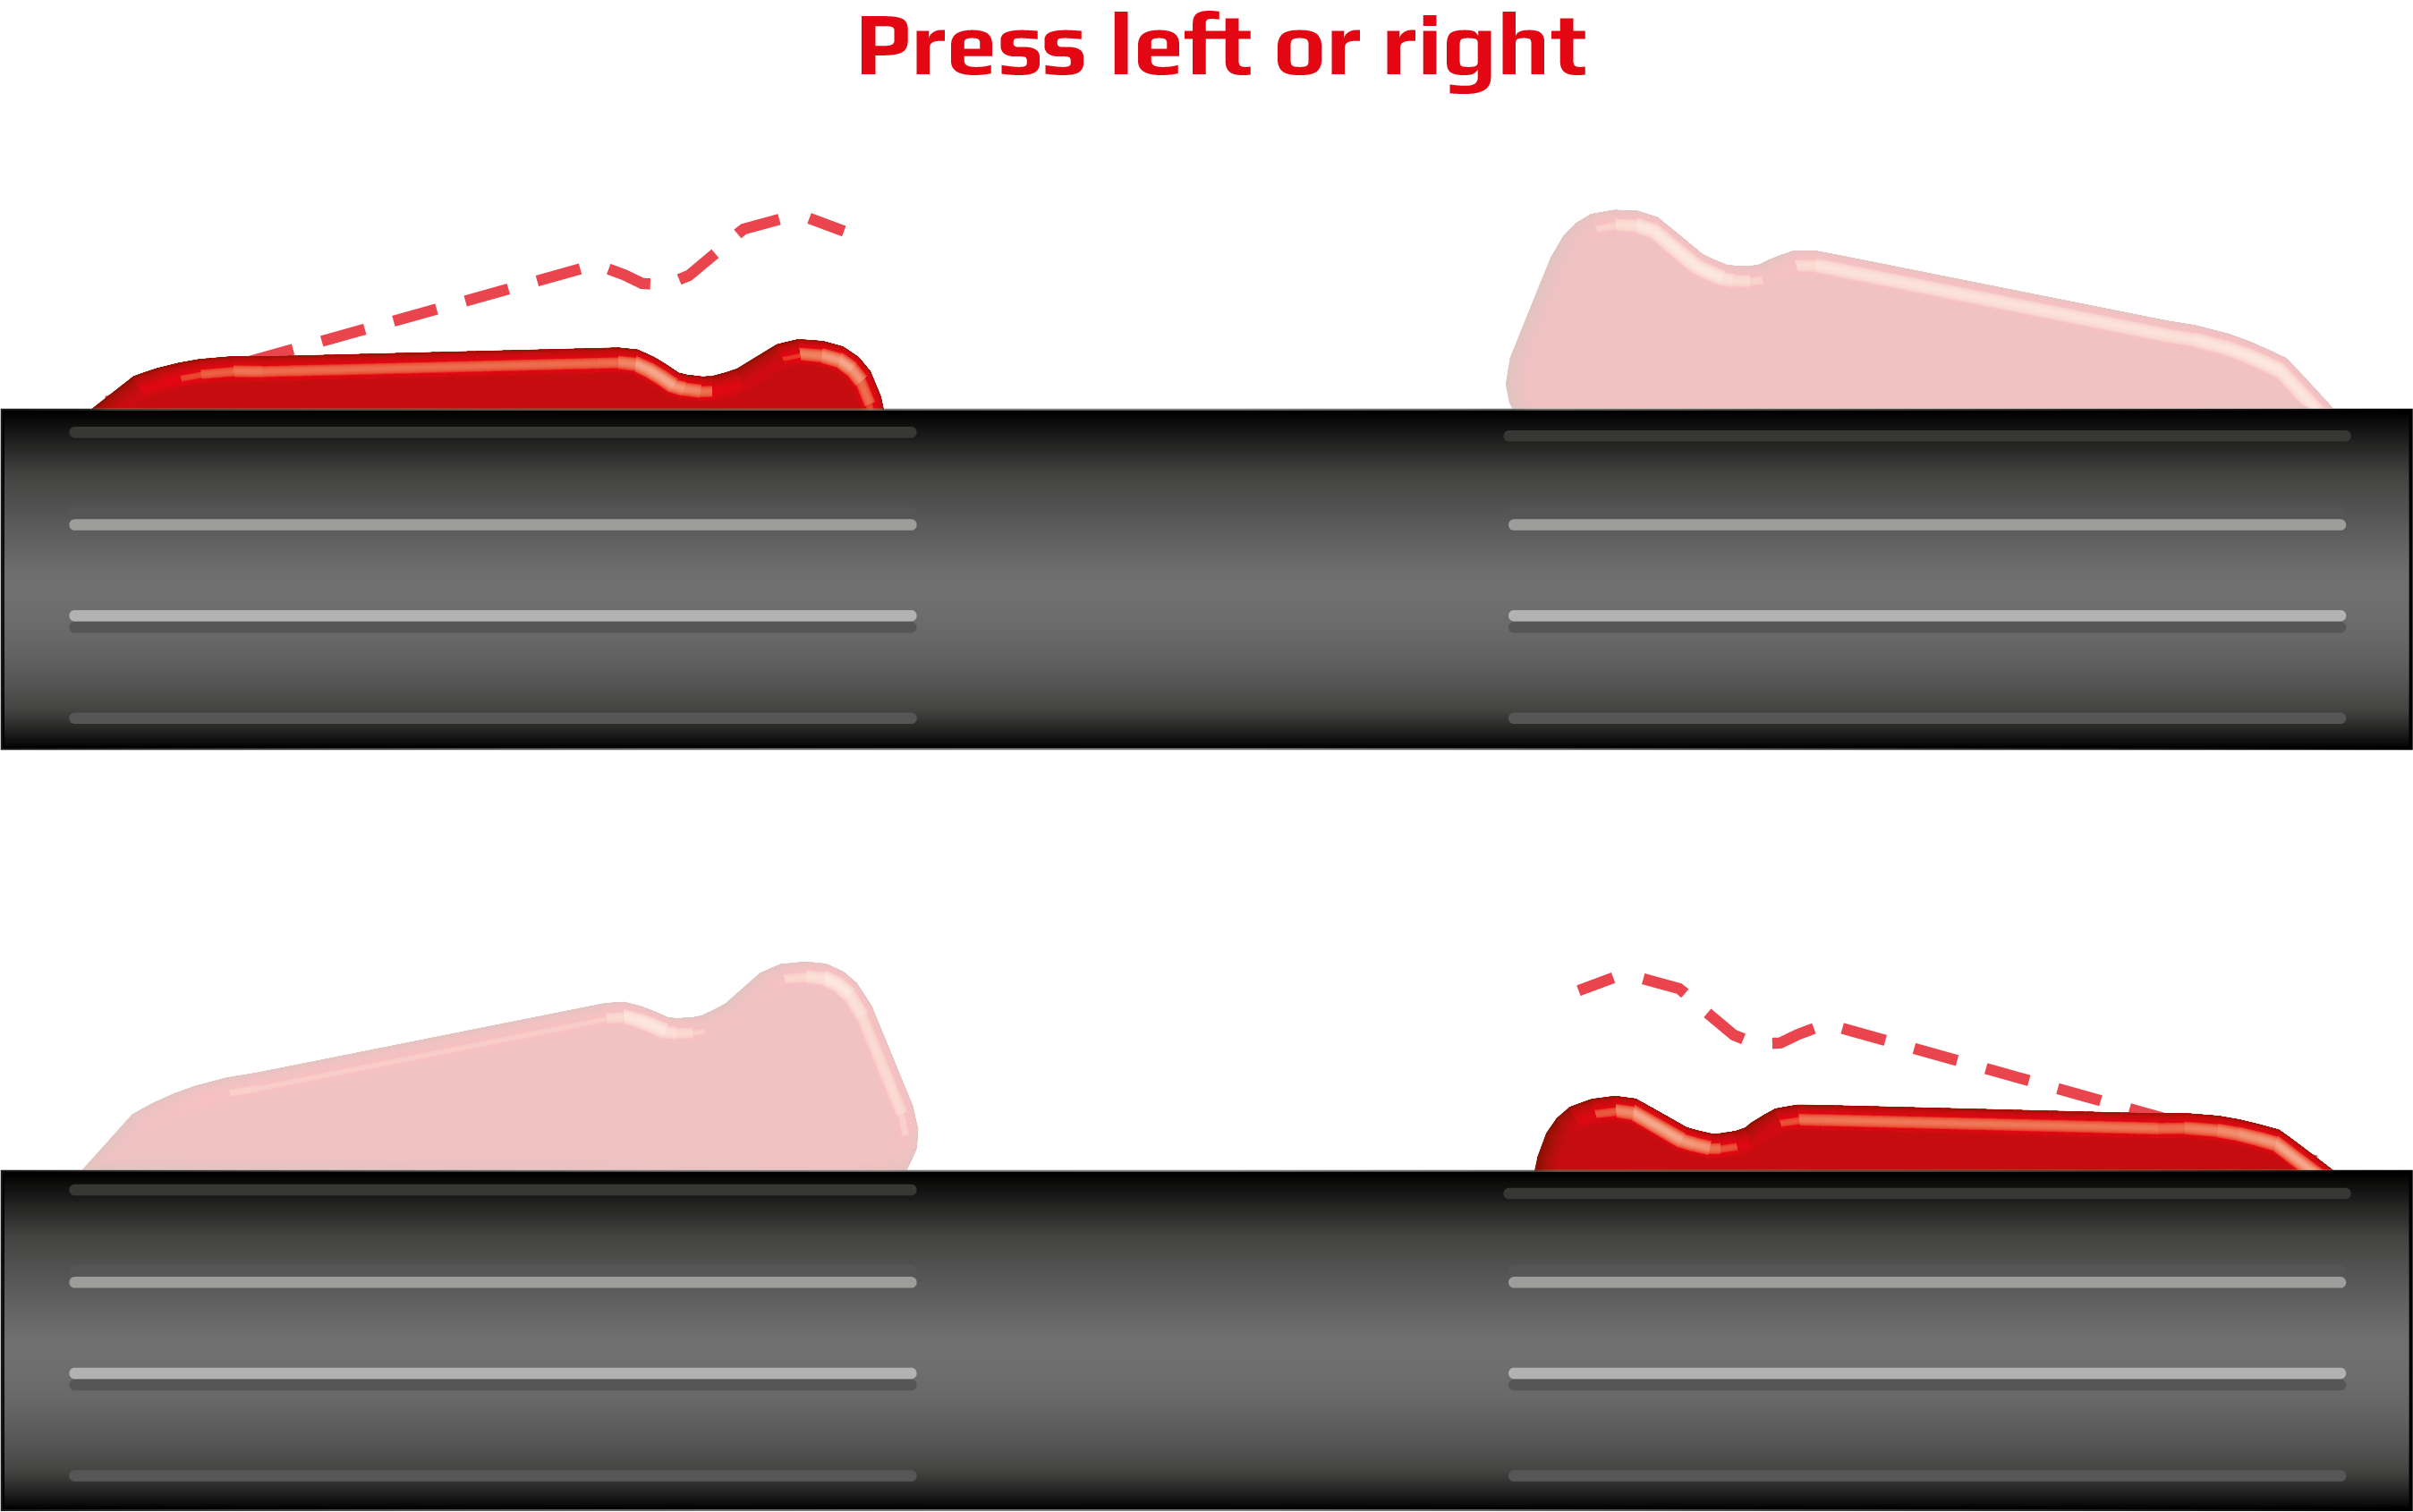
This also means that the propeller will spin as long as the gear is not 0 and at least one button is pressed. This allows for changing the hand that controls the scooter on the way.
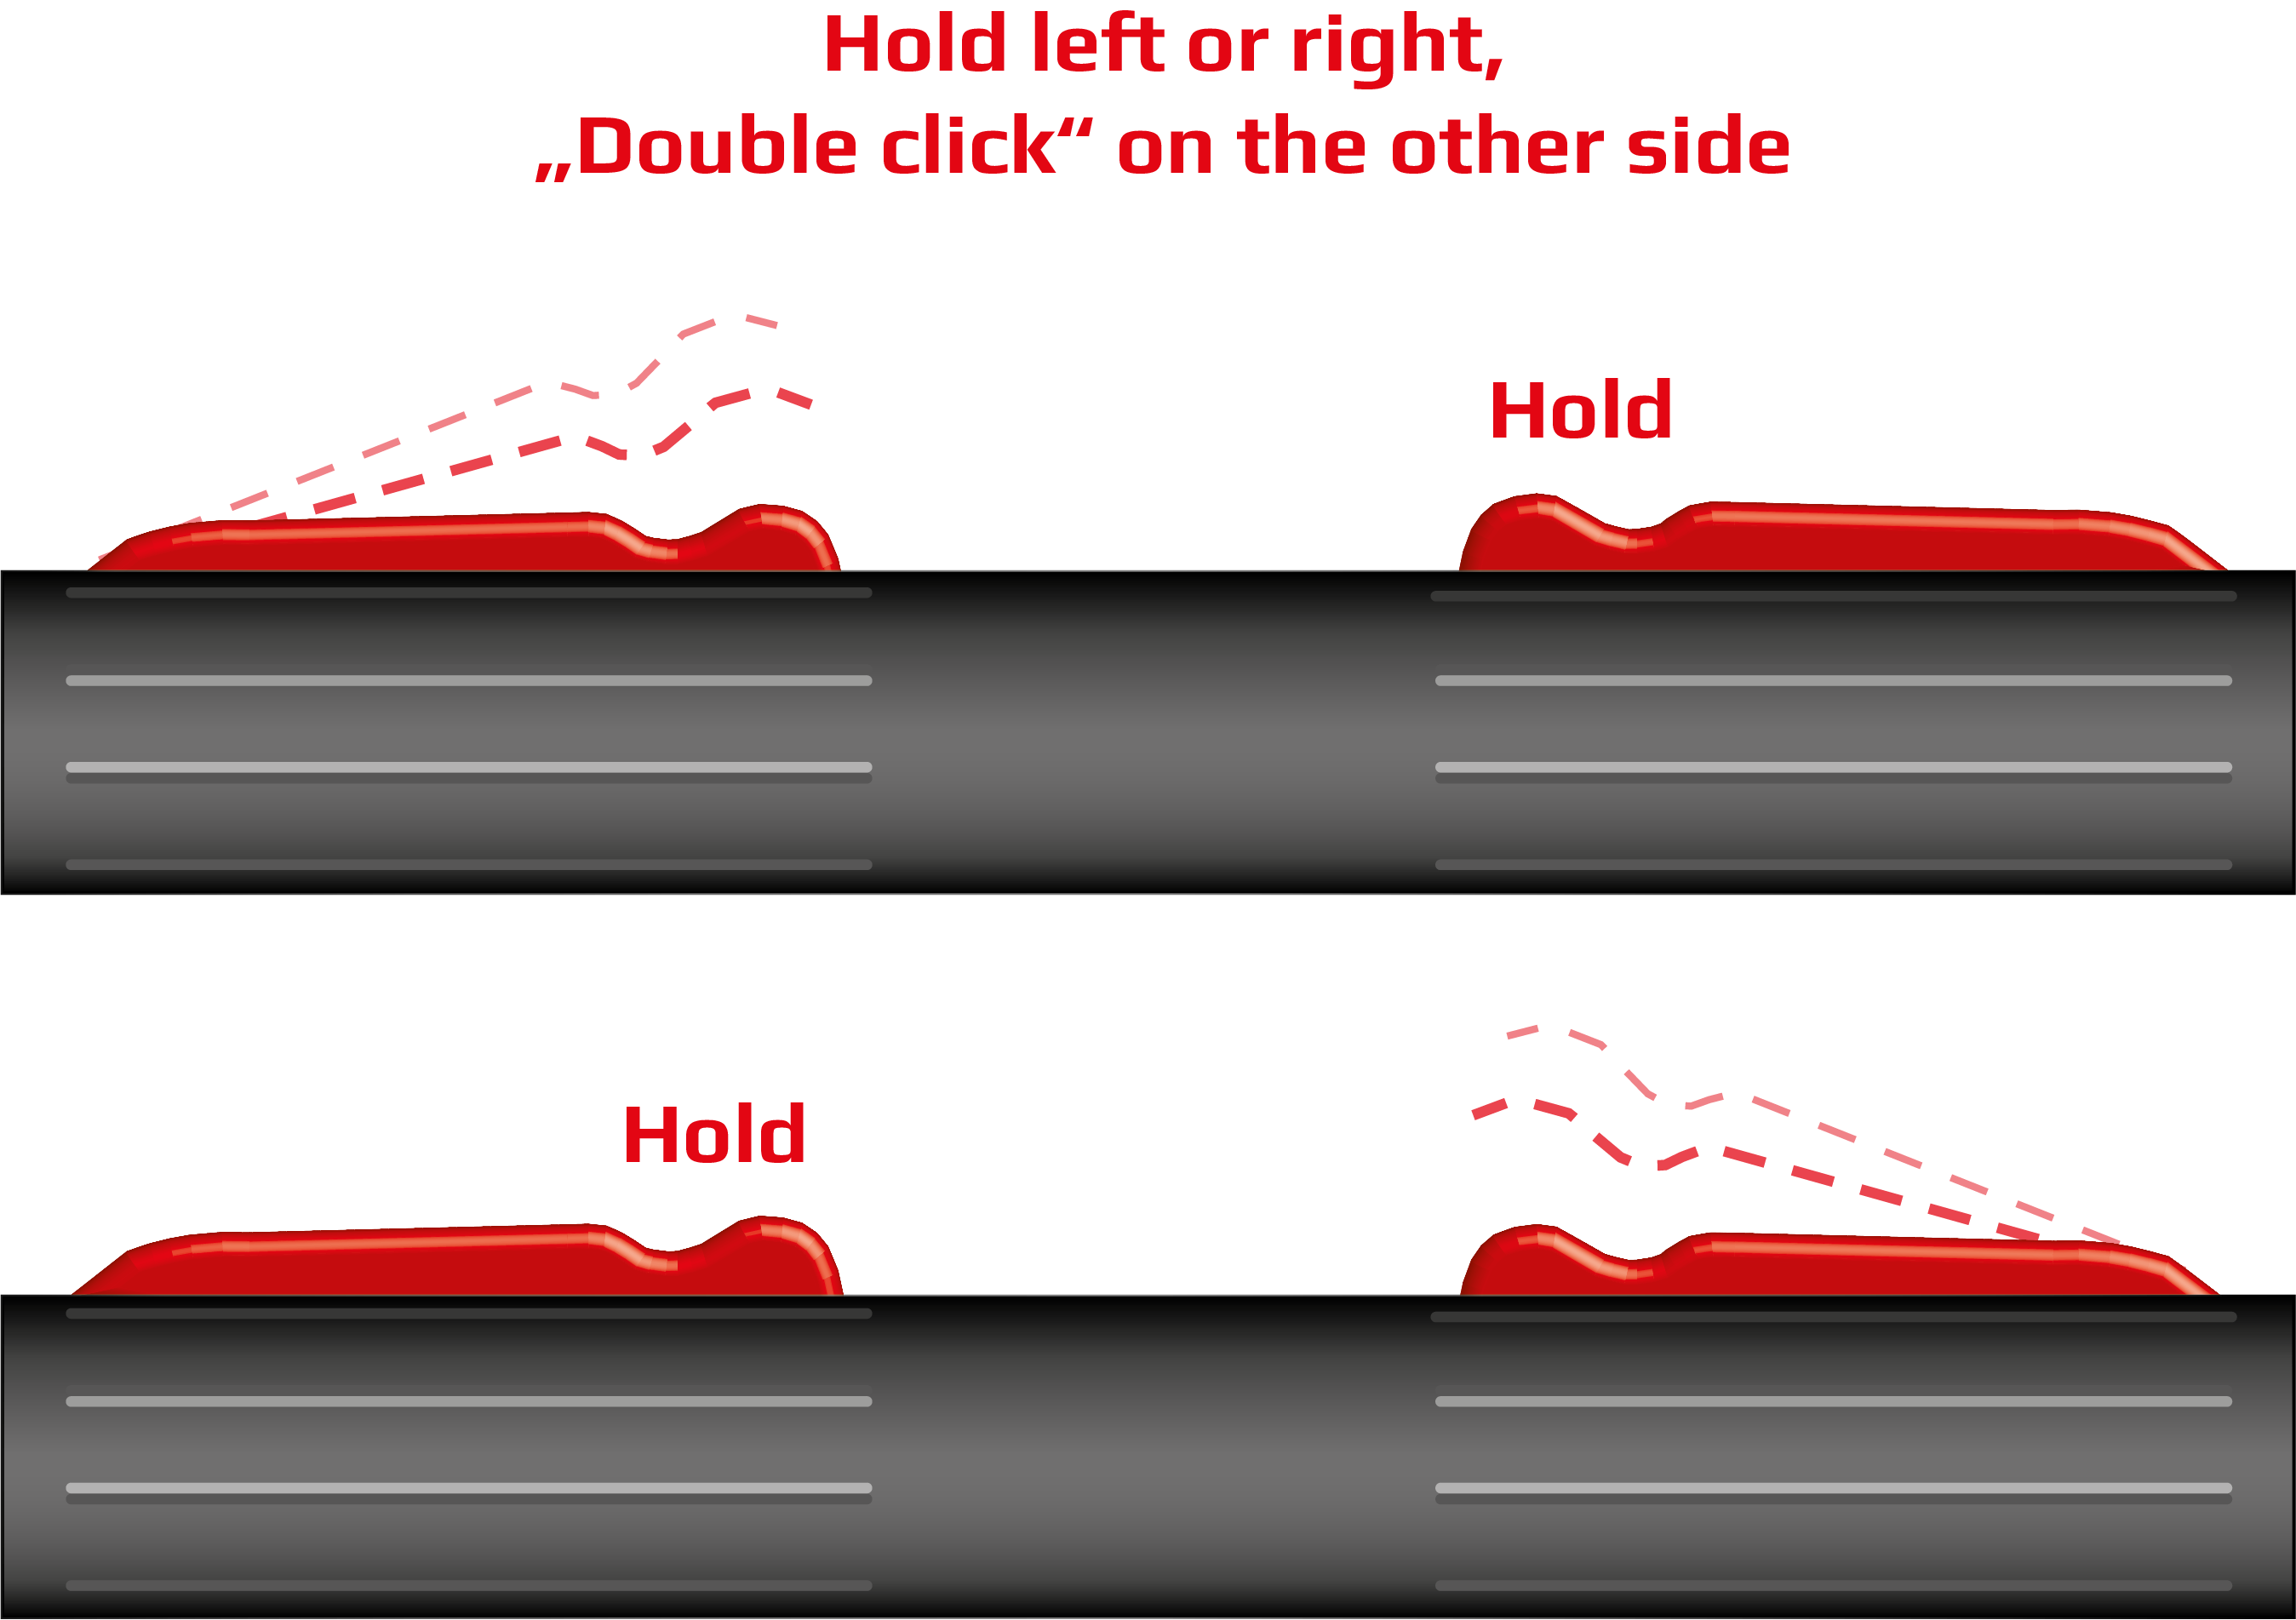
Fast Unlock
When the Fast Unlock function is activated and scooter is in gear [0] (Standby mode), it is possible to quickly start the scooter with the last-used gear.
To do this, press either the left or right button on the steering handle twice in less than 0.5 seconds.
→ Setting the Security Options – Fast Unlock.
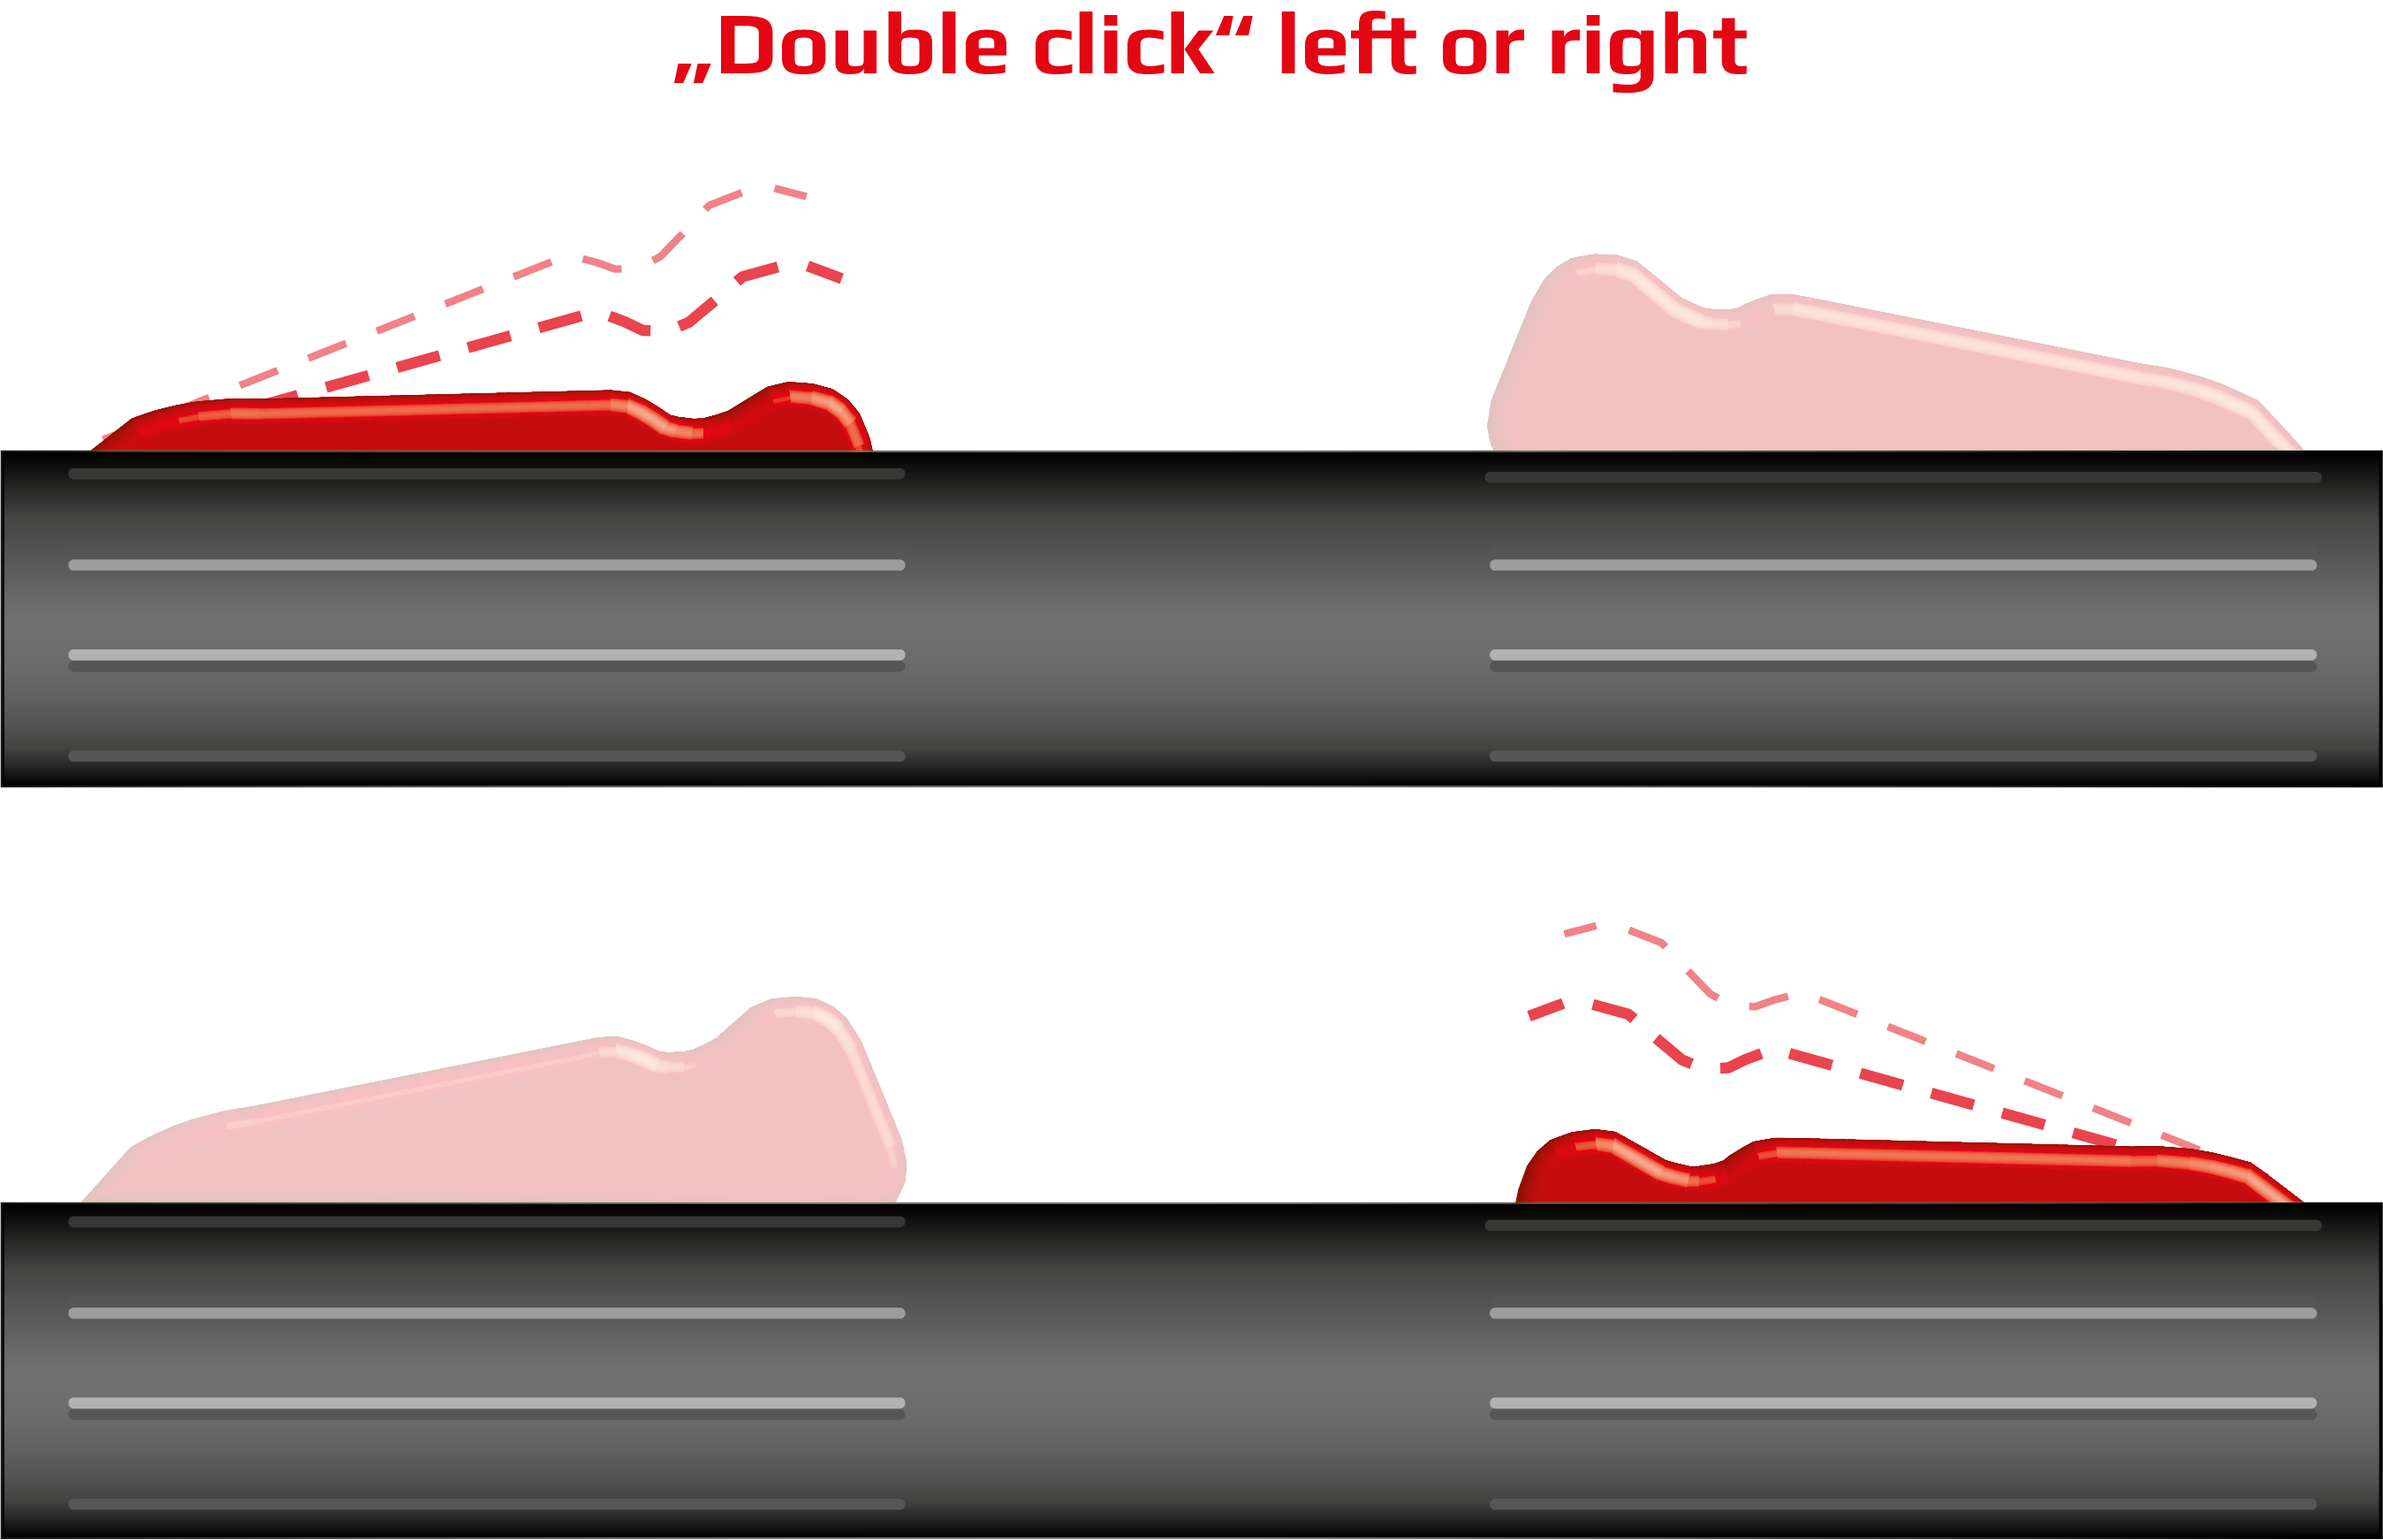
Instant Acceleration – Double Tap
This functionality is available with the Double Tap function activated.
When using gears 1-8 and having one of the buttons on the steering handle pressed, the user simultaneously presses the other button on the steering handle twice and quickly – like a “double click” with a computer mouse. Then, the scooter will immediately shift gear to the highest possible gear, i.e. [9], [7] or [5], depending on the battery status.
To return to the gear before the acceleration, simply repeat the “double tap” on one side.
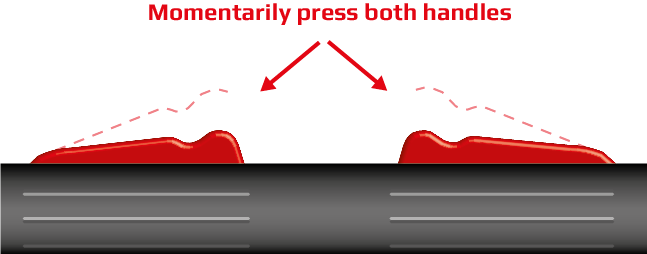
Showing / Hiding Parameters on the Way
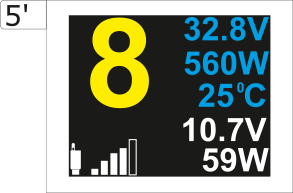
Quickly press and release both buttons on the control handles (less than 1 second) will display the operating parameters of the scooter on screen 5:
Parameter display
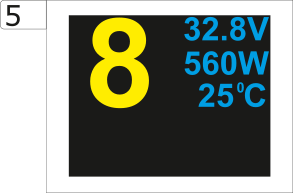 |  |
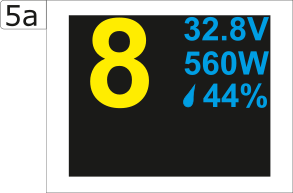 | 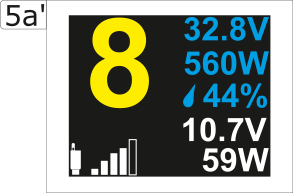 |
In addition to the gear number (yellow), there are additional information displayed. Row 4 and 5 ( voltage and power) displayed in white, are visible only when power converter is installed.
Row 3 will be alternating ever 3s to display internal unit temperature, and humidity.
| 32.8 V | operating voltage (V) |
| 560W | power drain (W) |
| 44% | humidity in electronics chamber (%) |
| 25⁰C | control system temperature (⁰C) |
| 10.7V (optional) | Currently delivered voltage from power converter |
| 59W (optional) | Currently delivered power from power converter |
In order to hide these parameters again, simultaneously, quickly press and release both buttons on the control handles (less than 1 second).
Stopping the motor
In order to stop the scooter temporarily, just release the buttons on the steering handle.
The scooter motor will stop immediately. Pressing any button on the steering handle again during the time range shorter than the one set on screen 7C1 (Time lock option, 3-60 seconds range) will allow to activate the motor and thus continue driving.
To stop the scooter for a longer period, switch to Standby mode as follows:
- Set gear [0] using button 19 at the display or
- Wait for scooter Auto-Lock to happen, without pressing any button on the steering handle.
As a result of each of the abovementioned actions the scooter gear will be reset to [0], the scooter will go into Standby mode. In such case even if the user accidentally presses the steering handle it will not activate the scooter’s motor.
Parking the scooter under water
To stop the scooter underwater and secure it against accidental power-on, the user should put it in Standby mode, or switch OFF with the main switch.
- Set gear [0] using button 19 at the display or
- Wait for scooter Time Lock to happen, without pressing any button on the steering handle (→ Setting the Security Options – Time Lock).
- Turn off the scooter using the main switch.